This tutorial needs you to understand basic use of 3dsmax.
Katana is one type of Japanese sword. This tutorial will explain to you how to model a katana using 3dsmax. This tutorial is divided into 4 parts. The first part explains how to create a tsuba (guard), a piece of metal separate blade and grip. The second part explains how to create the blade. The third part is how to model handgrip. The last, you will learn how to texture this sword.
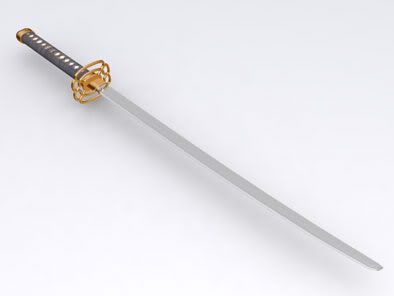
Look at image below. This image shows katana you are going to create. This katana is based on my imagination. The length, size, or design is solely my imagination.
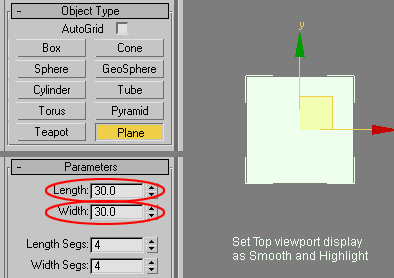
1. First, we will create a tsuba (guard), a piece of metal separate blade and grip. Create a plane in the Top viewport. Use 30x30 for size. Set Top and Perspective viewport display to Smooth+Highlights (press F3 in keyboard). Also activate Edge Faces (F4).
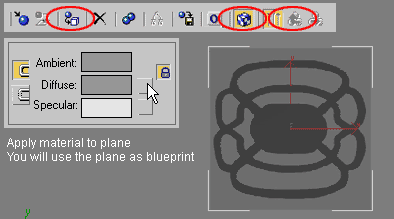
2. Next, you need to download bitmap file, tsuba.jpg. Open Material Editor. In Blinn Basic Parameters, click on small button right next to Diffuse. In Material/Map Browser window, make sure you choose Browse From: New. Click Bitmap and use file tsuba.jpg you have downloaded earlier. When finished, click Go To Parent button, and activate Show Map in Viewport. Make sure plane object is selected. Apply this material to plane by clicking Assign Material to Selection button. Now, you can use the plane as blueprint.
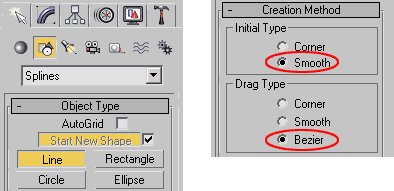
3. In Create tab, click Shape icon. Choose Line for Object Type.
In Creation Method rollout, use Initial Type:
Smooth and Drag Type: Bezier. These settings is perfect for creating curvy line.
4. Based on blueprint, click in Top viewport to create curvy line like image below. Don't worry if your drawing is not as precise with blueprint. You can modify later. Just make sure, you close the line by clicking again to the point you started before.
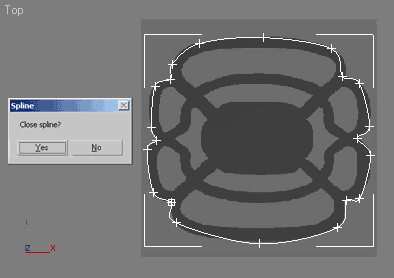
5. When you finished drawing a closed line, in Command Panel, go to Modify tab. Activate Vertex selection. Move any vertex to modify curve until you get desired one. For a corner that need pointy lines like image below, right click on vertex and change it to Bezier Corner. Then, you can move the handles to create pointy lines. When finished, de-activate Vertex selection.
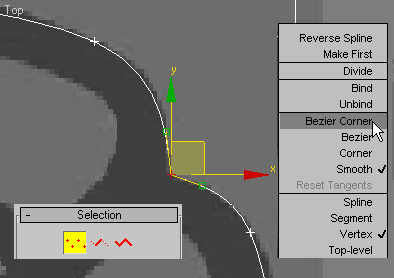
6. Continue your drawing by creating other lines. Make sure all lines are closed. Use the same technique like above. You don't need to draw all lines. Use Mirror to create copies of opposite drawing. When finished creating all lines, select one line. In Modify tab, in Geometry rollout, click Attach button. Then click all other lines one by one. Now, you have one line object only. If you have difficulties creating the lines, you can download this file. This 3dsmax file contains finished tsuba line.
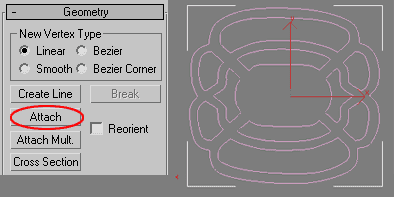
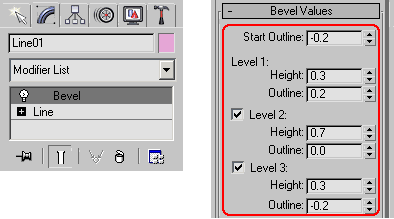
7. De-activate all sub-object selection. In Modify tab, add Bevel modifier.
Use Bevel values like image below. Start Outline negative value is used to create thinner tsuba.
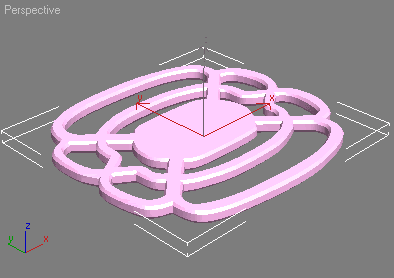
8. You will get something like image below.
((((((((((((((((((((((((((()))))))))))))))))))))))))
This tutorial needs you to understand basic use of 3dsmax
After you've created a tsuba in Part 1. Next, we will create the blade. Katana's blade is one side only. It means katana only have one sharp side. You will use simple technique here, but fast. Now, let's get going.
1. In Front viewport, create Rectangle. Use Length=180 and Width=4. Position it like image below..
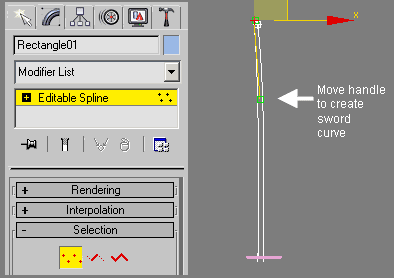
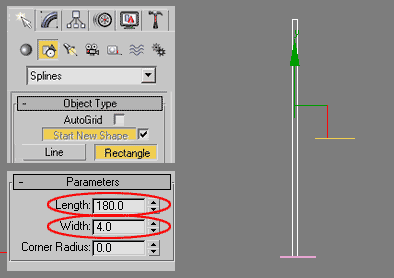 2. Right click on rectangle, and choose Convert to>Convert to Editable Spline. Go to Modify Panel, activate Vertex Selection. By converting to editable spline, now each vertex in rectangle behave like Bezier Corner. Move upper vertices a little bit to the left and move handles to the right to create curvy line.
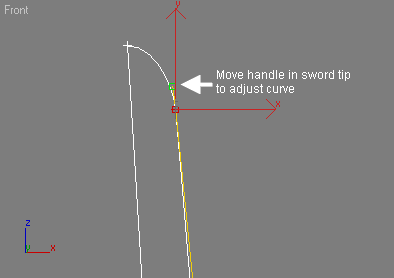
 3. For blade tip, move vertices like image below, and move handle also. When finished de-activate Vertex selection.
 4. Next step is to give thickness to the blade. In Modify tab, add Extrude modifier. Use 1.5 as Extrude Amount value.
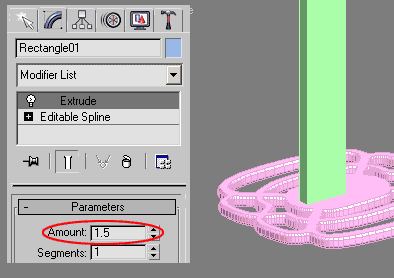 5. Now, we will create sharp side. Activate Edge selection. In Perspective viewport, select all horizontal edges on right side of the blade like image below. Select all horizontal edges from top to bottom. Remember, the right side only. You need to zoom in if necessary.
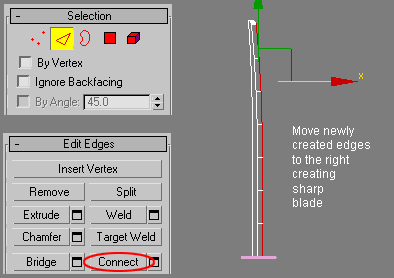
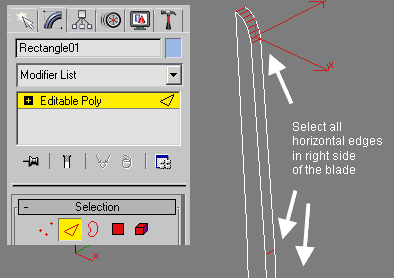 6. When all horizontal edges selected, in Edit Edges rollout click Connect to divide them. Don't deselect anything yet. Now, use Select and Move tool to move newly created edges to the right. Look at image below.
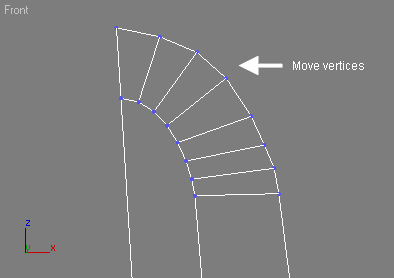
 7. Next, activate Vertex selection. Zoom in blade tip. Use Select and Move tool to modify vertex position. Use image below as reference.
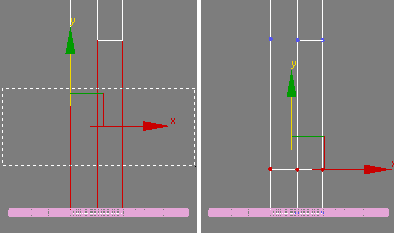
 8. In the next step, you will create the base for the blade. Change selection to Edge. Select all vertical edges at the bottom of the blade. Use Connect to create horizontal edges. Change to Vertex selection. Move vertices a little bit to the bottom.
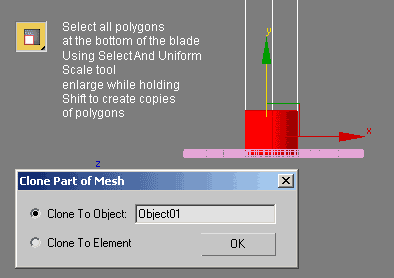
 9. Change to Polygon selection. Select all polygons at the bottom of the blade. Using Select And Uniform Scale tool, enlarge while holding Shift to create copies of those polygons. When a small window appear, choose Clone to Object. When finished, de-activate all sub-object selection.
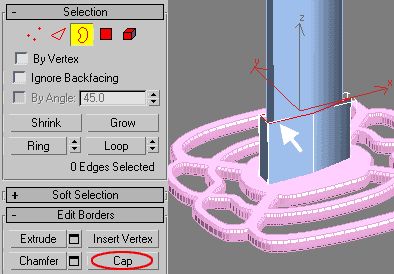
 10. Now, select your newly created object. It has a hole that need to be fixed. Activate Border selection. Select border in the hole. In Edit Borders rollout, click Cap to fill the hole. Your blade is now finished.
1. In Front viewport, create Rectangle. Use Length=180 and Width=4. Position it like image below..


((((((((((((())))))))))))))))))
((((((((((((((()))))))))))))))
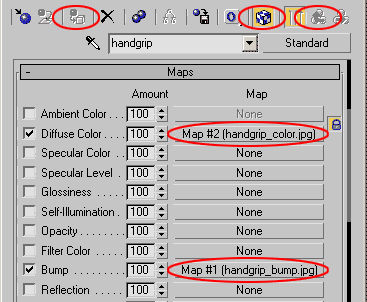
This tutorial will explain about texturing process. Here we go. 1. First, we try to texture a handgrip. You will need these bitmap file, download here. Open Material Editor. Click to open Maps rollout. Click None button right next to Diffuse Color. In Material / Map Browser window, make sure Browse From: New is selected. Click Bitmap twice. Use the file you have downloaded earlier (handgrip_color.jpg). Click Go To Parent button to go back to the Maps rollout. Repeat the same process to apply handgrip_bump.jpg in Bump channel. Increase Bump value if you want. When finished, click Go To Parent button until you go back to Maps rollout. In viewport, select handgrip object (smaller cylinder), and click Assign Material to Selection to apply this material. Activate Show Map in Viewport.
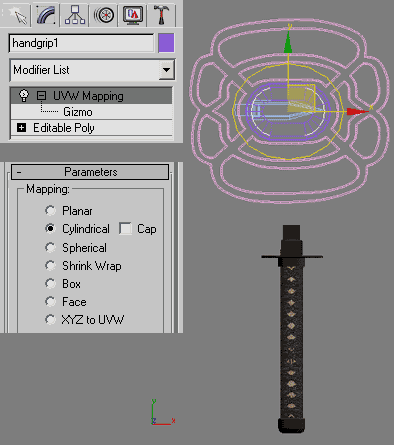
2. You may notice the texture position is not quiet right. We will fix this. In Modify tab, apply UVW Map modifier. Choose Cylindrical for Mapping type. In Modifier stack, click plus sign (+) on left of UVW Map. Gizmo row will appear. Select Gizmo row. In Top viewport, Gizmo is represented as yellow circle. Rotate this Gizmo until your handgrip is textured in the right way.
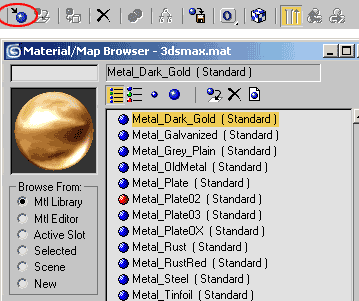
3. For other object, open Material Editor. Select unused material slot. Click Get Material button. In Material / Map Browser window choose Browse From: Mtl Library. You can apply any texture you want. For example, I use Metal Dark Gold for tsuba, blade base and handgrip base. For blade object, I use Metal Chrome.
4. Image below shows rendered Katana.

موديل جاهز للسيف
This tutorial needs you to understand basic use of 3dsmax
After creating tsuba in Part 1 and blade in Part 2, you will create a handgrip for your katana. It is very easy to create a handgrip. In just a minute you will create it. Don't believe me? Let's go to the process.
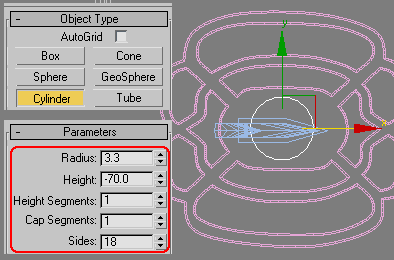
1. In Top viewport, create a Cylinder. Use Radius=3.3, and Height=-70. Position Cylinder at the middle of tsuba..
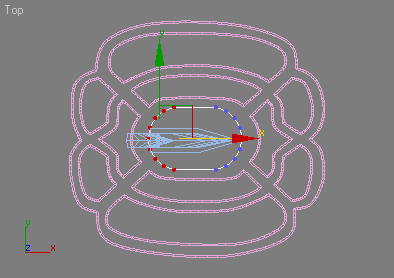
 2. Right click on Cylinder and choose Convert to>Convert to Editable Poly. In Modify tab, activate Vertex selection. In Top viewport, move half of vertices to the right, and the others to the left. In the Top viewport, the shape you will get is like a capsule.
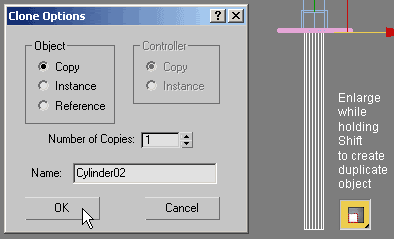
 3. De-activate all sub-object selection. In Front viewport, use Select and Uniform Scale Tool to enlarge a little bit while holding Shift. A small window appear. Choose Copy as a Clone Option.
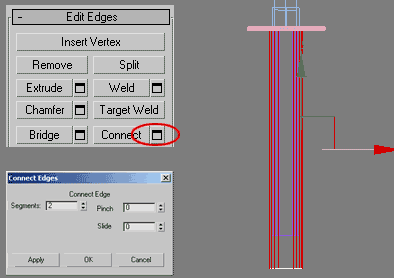
 4. Next step is to modify your duplicated cylinder. Select duplicated cylinder. Go to Modify tab. Activate Edge Selection. Select all vertical edges. Then, in Edit Edges rollout, click Connect Settings button. Fill in Segments=2. Click OK.
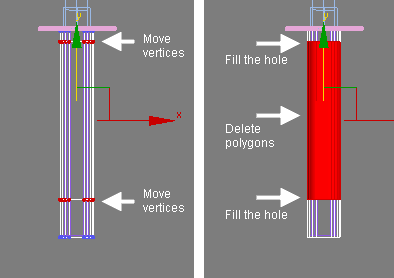
 5. Change selection to Vertex. Move vertices close to the top and bottom. Look at image below for reference. Change selection to Polygon. Select all polygon in the middle of cylinder. Delete them. Change selection to Border. Fill the hole with Cap button.
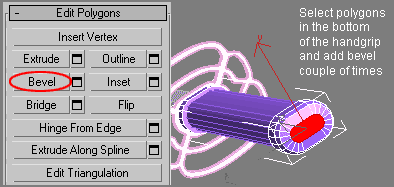
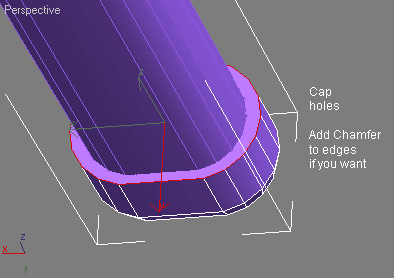 6. Last step in modeling process. Rotate Perspective view until you can see the bottom of handgrip. Change selection to Polygon. Select one polygon at the bottom. In Edit Polygons rollout, click Bevel. Click and drag in viewport to to give bevel to the bottom of the handgrip. Repeat to give bevel again, until it looks more rounded. Well, modeling process is finished. Next, we go to the texturing process.
After creating tsuba in Part 1 and blade in Part 2, you will create a handgrip for your katana. It is very easy to create a handgrip. In just a minute you will create it. Don't believe me? Let's go to the process.
1. In Top viewport, create a Cylinder. Use Radius=3.3, and Height=-70. Position Cylinder at the middle of tsuba..


((((((((((((((()))))))))))))))
This tutorial will explain about texturing process. Here we go. 1. First, we try to texture a handgrip. You will need these bitmap file, download here. Open Material Editor. Click to open Maps rollout. Click None button right next to Diffuse Color. In Material / Map Browser window, make sure Browse From: New is selected. Click Bitmap twice. Use the file you have downloaded earlier (handgrip_color.jpg). Click Go To Parent button to go back to the Maps rollout. Repeat the same process to apply handgrip_bump.jpg in Bump channel. Increase Bump value if you want. When finished, click Go To Parent button until you go back to Maps rollout. In viewport, select handgrip object (smaller cylinder), and click Assign Material to Selection to apply this material. Activate Show Map in Viewport.

2. You may notice the texture position is not quiet right. We will fix this. In Modify tab, apply UVW Map modifier. Choose Cylindrical for Mapping type. In Modifier stack, click plus sign (+) on left of UVW Map. Gizmo row will appear. Select Gizmo row. In Top viewport, Gizmo is represented as yellow circle. Rotate this Gizmo until your handgrip is textured in the right way.

3. For other object, open Material Editor. Select unused material slot. Click Get Material button. In Material / Map Browser window choose Browse From: Mtl Library. You can apply any texture you want. For example, I use Metal Dark Gold for tsuba, blade base and handgrip base. For blade object, I use Metal Chrome.

4. Image below shows rendered Katana.

موديل جاهز للسيف
Description: Japanese sword Katana. 3D model with texture.
File Author: Didik Wijaya
File Size: 130kb
File Type: MAX
File Author: Didik Wijaya
File Size: 130kb
File Type: MAX
حمل من هنا :::::::
Screenshot:
مع تحيات ناقل الدروس الأجنبية طباخ ماكس


تعليق