
 تويت
تويت
brief : 3ds max is a very deep and powerful 3d program used in very wide commercial and advertising fields now a days.
In this series we’re going to go over the basics of 3ds max.
So let’s get started:
Once you setup 3ds max on your computer you will see this shortcut icon on your desktop.

also you can access to 3ds max by hitting the Start button – all programs – Autodesk – Autodesk 3ds max – Autodesk 3ds max

When you lunch the program for the first time this is what you’ll see.

This learning movies window has few tutorial movies for 3ds max from Autodesk.
If you don’t want this window to appear again you can click on the checkbox and this window won’t appear again.

To access to this window again go to the Help menu and choose Essential skills movies.

If it’s your first time opening a 3d program you may be afraid.
Don’t be afraid from what you see because in the next few minutes we’ll explore the interface together.
We’ll take first a fast tour and then we’ll dig into everything deeply.
The (UI) user interface is a very windows like, you’ll see the menu bar on the top which has file (on 3ds max 2010 the Autodesk icon on the top left is instead of file menu) – edit – tools …….

Here we have the tool bar which brings the most use functions so you can use like undo – move – rotate – scale ……….

along on the right side of the screen we have the command panel and that has a number of different tabs.

1-Create : which allow me to create different things so we’ll be getting into this a little bit later.
2-Modify : this is where we built modifications to create complex objects.
3-hierarchy : which allows us to attach objects together in hierarchy such as for character animation.
4-Motion : this is one panel you would use when you animating.
5-Display : and this allows us to display and hide objects by type ( for example cameras – lights – shapes ………etc).
6-Utilities : are basically advanced custom programs that Autodesk provides you or you can also get third party programs to help you manage your scene.
Along the bottom of the screen we have our time line, and we have a slider here that we can slide through our frames thus we animate and on the right bottom side we have our time controller (play – next frame – previous frame – go to end – go to start) buttons.

and the object coordinates which show where is the object in the scene and the view port controls.

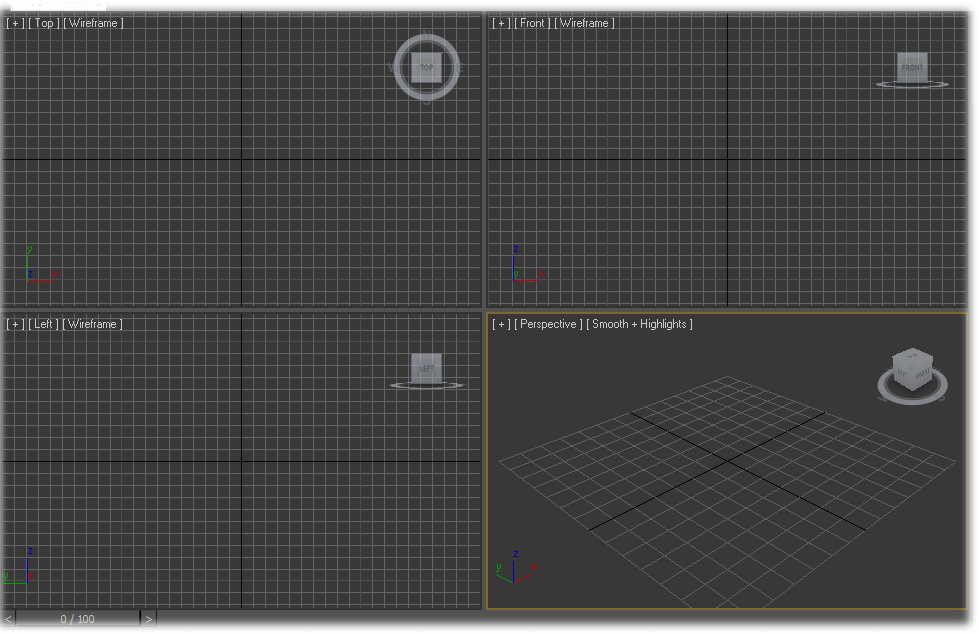
and the most important part the view ports which are the space we use to create, model, shade, animate ………. Our objects
there are four view ports (we can change that later) the left, front, top sides which looks 2d and the perspective view port the only one looks 3d.
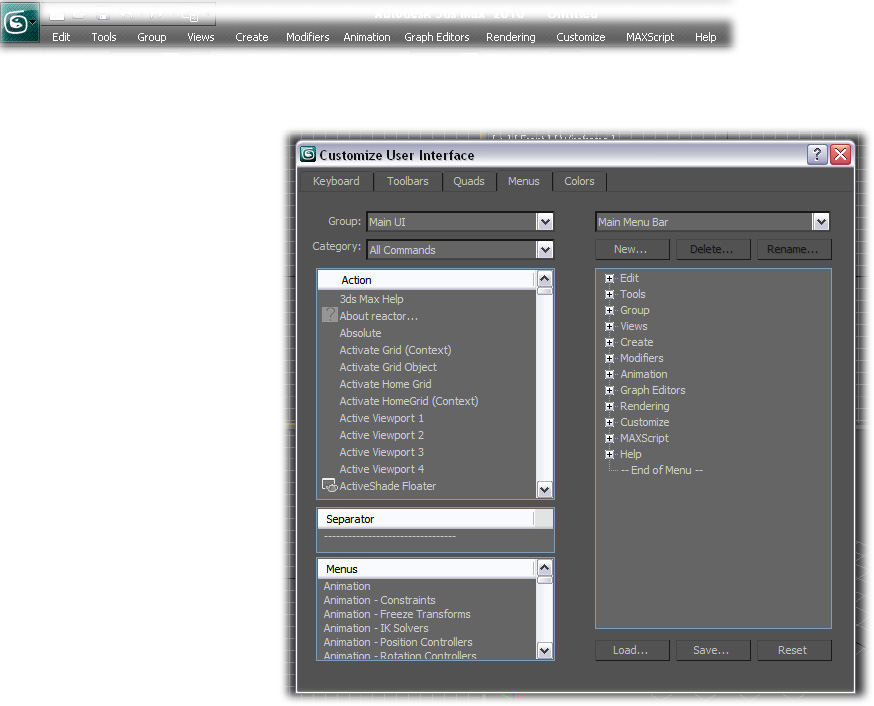
One of the things that you may want to do with your UI user interface is to customize it.
Under the menu bar the customize menu.
Under the customize menu we have a number of different options that allow you to adjust and modify the max interface to your liking.

The first item you’ll see in customize menu is customize user interface and this gives you a lot of different options.

the first tab that you’ll see is the keyboard tab and that allows you to set hot keys (shortcut keys) for all of the various functions that you want to do.
You can also customize toolbars to make your own toolbar which this what we see along the top.

the quads menu is for customizing menus that show up under knees your mouse clicks.

We can also customize the actual menus.
Also under customize menu there is option to load custom UI which usually be at the following pass (C:\Program Files\Autodesk\3ds Max 2010\ui ) or where you setup your program.

I’ll choose the ame-light custom UI and click open then the UI will look brighter just like that.

and you can also save the UI which you customized (after customizing the menus and quads and toolbar) so you can load it when you want.
To be continued .....
تعليق