
 تويت
تويت
The following tutorial is courtesy of "Illustrator CS Most Wanted Techniques and Effects" by Matt Kloskowski
In this exercise, you're going to create a leaf using the Mesh tool. I must first warn you that this exercise isn't for the faint of heart. The Mesh tool is one of Illustrator's most powerful tools-along with that power comes complexity. However, I'll break each Step down for you to make it as easy to follow along as possible. Good luck!
Step 1
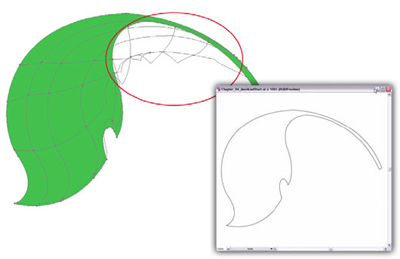
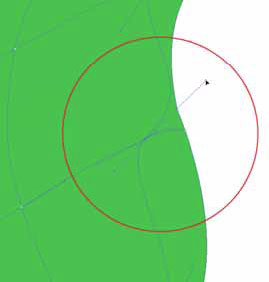
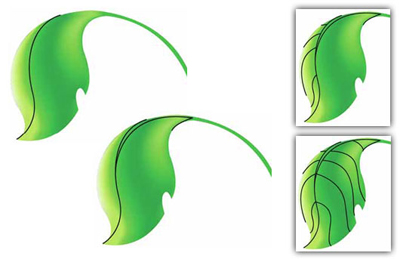
This file contains the outline of the leaf that you'll use for this tutorial. The first Step in this illustration is to decide if your shape will be a good candidate for using the Mesh tool. Unfortunately, this task is very subjective and will depend on the object that you wish to apply a mesh to. For this exercise, I've decided that the stem of the leaf needed to be separate from the actual leaf area. In the following reference image, I've created a mesh using the Mesh tool to help illustrate why. Notice all of the mesh points and lines that exist in the circled area. If you were to leave these points as is, it would wreak havoc on your ability to create a realistic-looking gradient mesh-color transitions would be too sharp and appear distorted. You can't delete them, as you would further deteriorate the mesh. The solution is to break the object apart into a stem and a leaf. Follow along to see how.
Step 2
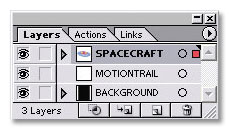
Duplicate the LEAF layer and name this copy OUTLINE. Drag this new layer below the LEAF layer. Also, lock and hide it for now. The next Step will modify the overall shape of the leaf, but you'll want to keep a copy of the outline for later use.
Step 3
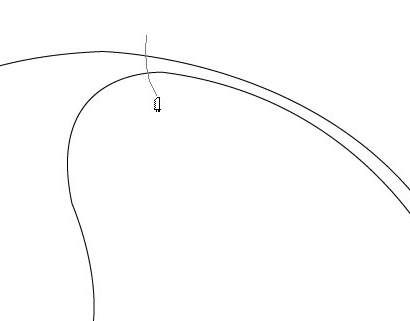
Select the Knife tool and slice through the area that you want to separate; the cut doesn't have to be precise.

Step 4
Name the sublayer that contains the stem path STEM. Name the other sublayer LEAF MESH.

Step 5
Next, select or target the LEAF MESH and STEM sublayers. Fill the shapes with R:72 G:185 B:51 and set the stroke to None.
The previous Step will aid you in creating the mesh for the leaf. Now you have a base color and you just need to modify the highlights and shadows instead of adding color to the entire leaf.
Step 6
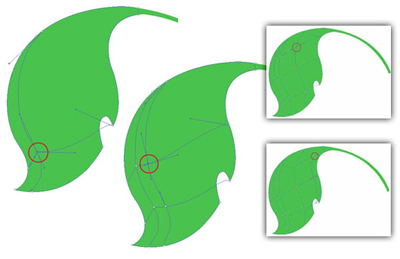
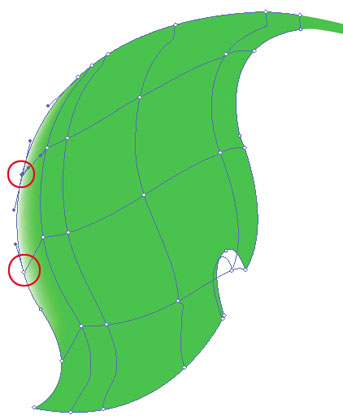
Select the Mesh tool (U). Using the following images as a reference, click each of the circled areas once. Precise mesh-point positioning isn't required here, but try to follow along as closely as possible. After each click, your mesh should begin to match the corresponding reference image.
A mesh basically creates, over your object, a distorted grid that follows the contours of its shape. Each time you click with the Mesh tool, you create an additional row or column for that grid. However, if you click along the same path horizontally, you'll only add an additional column to the grid, and the number of rows will remain the same. Alternatively, if you add points vertically along the same path, you'll create additional rows but not columns. Finally, if you add mesh points that aren't on any of the existing vertical or horizontal mesh lines, then you'll create an additional row and column. This is similar to the first three images in the previous Step.
Next, you're going to select mesh points within the leaf object and change the colors. This will produce a gradual color shift similar to a gradient. Before you move on to this Step, I'd like to first point out a key concept. The wonderful thing about the Mesh tool is that the mesh points it produces are similar to anchor points and paths. You select and manipulate mesh points in the same way that you would a path. See the following reference image for an example.
Step 7
If it isn't already selected, select the LEAF layer using the Selection tool or by clicking the meatball in the Layers palette.
Select the open arrow Direct Selection tool from the toolbox.
There are actually two methods that you can use when selecting points on an existing mesh. You can use the Direct Selection tool, as suggested in Step 8, or the Mesh tool itself. I prefer to use the Direct Selection tool since it will only select points on the mesh. If you use the Mesh tool, you run the risk of adding another mesh line if you accidentally click an open area within the mesh instead of the mesh point. Since Illustrator's anchor points are small and can be difficult to select, this is a very real possibility.
Step 8
Click each mesh point that I've circled in this reference image and change the fill color to R: 233 G:255 B:227.
Turning on Smart Guides (CTRL/CMD+U) for the rest of the exercise may aid you in selecting mesh points.
You can change the fill color by using the Color palette, the Swatches palette, or by double-clicking the Fill swatch in the toolbox.
Step 9
Now select the following anchor points.
Step 10
Change the fill color of these points to R:192 G:249 B:93.
This should produce a nice color shift along the left side of the leaf. It looks pretty good so far, but you have a few more changes to make.
Step 11
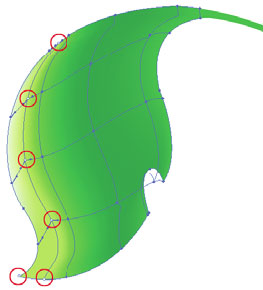
Select the points displayed in this reference image.
Step 12
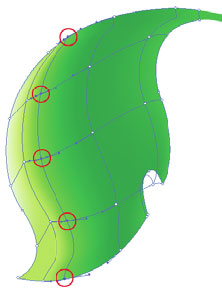
Change the fill color to R:98 G:214 B:60. Next, select these points.
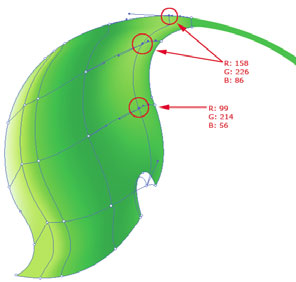
Step 13
Change the fill color to R:51 G:160 B:44. Hopefully, you get the idea. Use this reference image to select the remaining anchor points and change their colors accordingly.
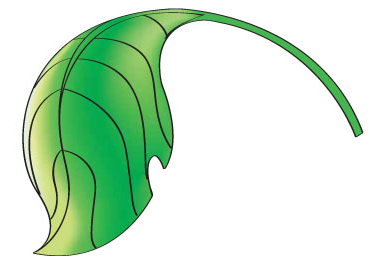
OK, if you've followed along, the hard part is done. All that remains are the veins that run through the leaf. You'll create these using the Pen tool. However, if you have an aversion to (or fear of) this tool, the source file includes a layer named VEINS that you can use without having to actually draw the veins.
Step 14
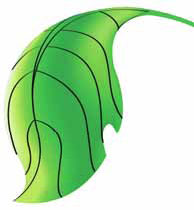
Create a new layer called VEINS on top of the leaf objects. Select the Pen tool and begin drawing the veins as I have in these reference images. Note that these aren't closed paths. When you wish to end your path, just press the ENTER/RETURN key.
Step 15
Next, select all of the paths on the VEINS layer. Choose Window>Brush Libraries>Artistic_Calligraphic. Select the 3 pt oval brush near the bottom of the palette to apply to your paths.
Step 16
Finally, unlock and select the OUTLINE layer. Choose the 3 pt oval brush from the same palette to apply to the outline path around the leaf.
منقول أكاديمية الجرافيك
In this exercise, you're going to create a leaf using the Mesh tool. I must first warn you that this exercise isn't for the faint of heart. The Mesh tool is one of Illustrator's most powerful tools-along with that power comes complexity. However, I'll break each Step down for you to make it as easy to follow along as possible. Good luck!
Click to enlarge
Step 1
This file contains the outline of the leaf that you'll use for this tutorial. The first Step in this illustration is to decide if your shape will be a good candidate for using the Mesh tool. Unfortunately, this task is very subjective and will depend on the object that you wish to apply a mesh to. For this exercise, I've decided that the stem of the leaf needed to be separate from the actual leaf area. In the following reference image, I've created a mesh using the Mesh tool to help illustrate why. Notice all of the mesh points and lines that exist in the circled area. If you were to leave these points as is, it would wreak havoc on your ability to create a realistic-looking gradient mesh-color transitions would be too sharp and appear distorted. You can't delete them, as you would further deteriorate the mesh. The solution is to break the object apart into a stem and a leaf. Follow along to see how.
Step 2
Duplicate the LEAF layer and name this copy OUTLINE. Drag this new layer below the LEAF layer. Also, lock and hide it for now. The next Step will modify the overall shape of the leaf, but you'll want to keep a copy of the outline for later use.
Step 3
Select the Knife tool and slice through the area that you want to separate; the cut doesn't have to be precise.
Step 4
Name the sublayer that contains the stem path STEM. Name the other sublayer LEAF MESH.
Step 5
Next, select or target the LEAF MESH and STEM sublayers. Fill the shapes with R:72 G:185 B:51 and set the stroke to None.
The previous Step will aid you in creating the mesh for the leaf. Now you have a base color and you just need to modify the highlights and shadows instead of adding color to the entire leaf.
Click to enlarge
Step 6
Select the Mesh tool (U). Using the following images as a reference, click each of the circled areas once. Precise mesh-point positioning isn't required here, but try to follow along as closely as possible. After each click, your mesh should begin to match the corresponding reference image.
A mesh basically creates, over your object, a distorted grid that follows the contours of its shape. Each time you click with the Mesh tool, you create an additional row or column for that grid. However, if you click along the same path horizontally, you'll only add an additional column to the grid, and the number of rows will remain the same. Alternatively, if you add points vertically along the same path, you'll create additional rows but not columns. Finally, if you add mesh points that aren't on any of the existing vertical or horizontal mesh lines, then you'll create an additional row and column. This is similar to the first three images in the previous Step.
Next, you're going to select mesh points within the leaf object and change the colors. This will produce a gradual color shift similar to a gradient. Before you move on to this Step, I'd like to first point out a key concept. The wonderful thing about the Mesh tool is that the mesh points it produces are similar to anchor points and paths. You select and manipulate mesh points in the same way that you would a path. See the following reference image for an example.
Step 7
If it isn't already selected, select the LEAF layer using the Selection tool or by clicking the meatball in the Layers palette.
Select the open arrow Direct Selection tool from the toolbox.
There are actually two methods that you can use when selecting points on an existing mesh. You can use the Direct Selection tool, as suggested in Step 8, or the Mesh tool itself. I prefer to use the Direct Selection tool since it will only select points on the mesh. If you use the Mesh tool, you run the risk of adding another mesh line if you accidentally click an open area within the mesh instead of the mesh point. Since Illustrator's anchor points are small and can be difficult to select, this is a very real possibility.
Step 8
Click each mesh point that I've circled in this reference image and change the fill color to R: 233 G:255 B:227.
Turning on Smart Guides (CTRL/CMD+U) for the rest of the exercise may aid you in selecting mesh points.
You can change the fill color by using the Color palette, the Swatches palette, or by double-clicking the Fill swatch in the toolbox.
Step 9
Now select the following anchor points.
Step 10
Change the fill color of these points to R:192 G:249 B:93.
This should produce a nice color shift along the left side of the leaf. It looks pretty good so far, but you have a few more changes to make.
Step 11
Select the points displayed in this reference image.
Step 12
Change the fill color to R:98 G:214 B:60. Next, select these points.
Step 13
Change the fill color to R:51 G:160 B:44. Hopefully, you get the idea. Use this reference image to select the remaining anchor points and change their colors accordingly.
OK, if you've followed along, the hard part is done. All that remains are the veins that run through the leaf. You'll create these using the Pen tool. However, if you have an aversion to (or fear of) this tool, the source file includes a layer named VEINS that you can use without having to actually draw the veins.
Click to enlarge
Step 14
Create a new layer called VEINS on top of the leaf objects. Select the Pen tool and begin drawing the veins as I have in these reference images. Note that these aren't closed paths. When you wish to end your path, just press the ENTER/RETURN key.
Step 15
Next, select all of the paths on the VEINS layer. Choose Window>Brush Libraries>Artistic_Calligraphic. Select the 3 pt oval brush near the bottom of the palette to apply to your paths.
Step 16
Finally, unlock and select the OUTLINE layer. Choose the 3 pt oval brush from the same palette to apply to the outline path around the leaf.
منقول أكاديمية الجرافيك