
 تويت
تويت
[]
Step 1
File size 1.4MB
TutorialStep 1
As usual, create a new composition with the settings you want. For resolution you really want to set at least Half or even Third because this one’s going to be a real resource killer. At least for rendering.

Step 2First, create a new solid for background. Make it black and give him a name.
At once, make another solid which will be the green spinning thing. Precompose it. I called the comp Spin_thing. Open the composition.
Save.
Step 3At once, make another solid which will be the green spinning thing. Precompose it. I called the comp Spin_thing. Open the composition.
Save.
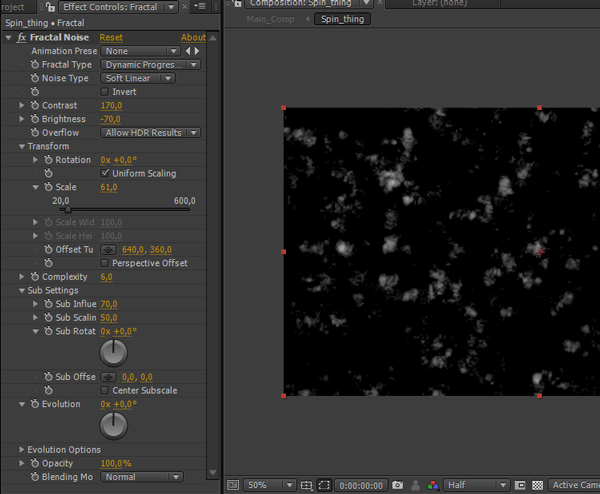
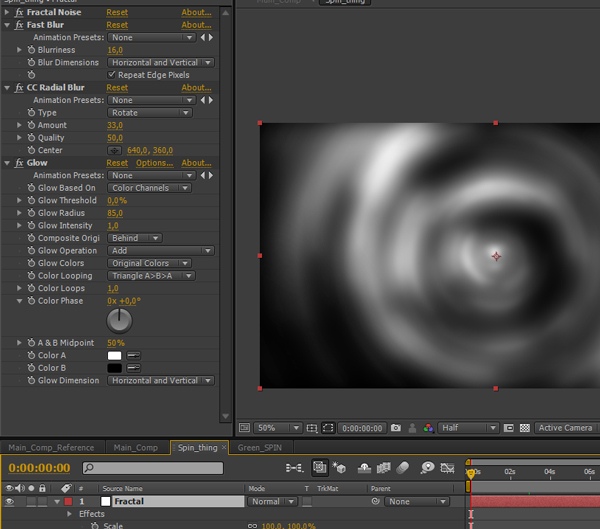
Some of you may have already guessed that we’ll be using Fractal noise. Apply it to the solid.
Now, let’s change the settings.
Change Fractal Type to Dynamic Progressive.
Next, we want to make its contrast pretty high, you’ll see why a bit later
Set Contrast to 170 and Brightness to -70
For more detail, bring down Scale under Transform submenu to 61 and Sub Scaling under Sub Settings to 50.
Note: The difference between Scale and Sub Scale is that Scale does scaling globally while Sub Scale does it in pixel level.
Step 4Now, let’s change the settings.
Change Fractal Type to Dynamic Progressive.
Next, we want to make its contrast pretty high, you’ll see why a bit later
Set Contrast to 170 and Brightness to -70
For more detail, bring down Scale under Transform submenu to 61 and Sub Scaling under Sub Settings to 50.
Note: The difference between Scale and Sub Scale is that Scale does scaling globally while Sub Scale does it in pixel level.
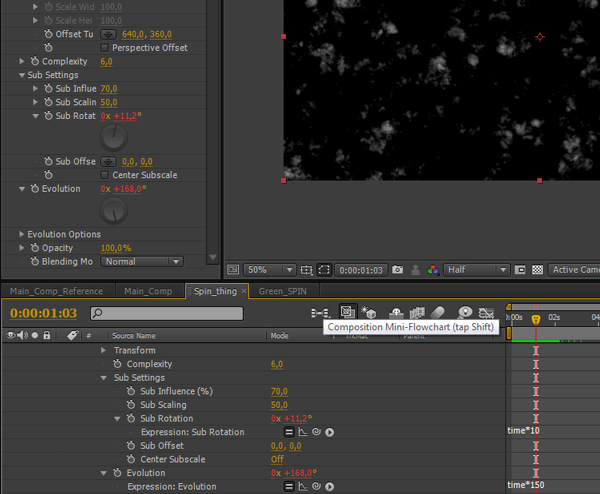
To make them lively, let’s set up expressions at two places.
First, Evolution: Alt+click on Evolution’s stopwatch and type in time*150
Do the same with Sub Rotation under Sub Settings and type in time*10
You’re done with Fractal Noise.
Save.
Step 5First, Evolution: Alt+click on Evolution’s stopwatch and type in time*150
Do the same with Sub Rotation under Sub Settings and type in time*10
You’re done with Fractal Noise.
Save.
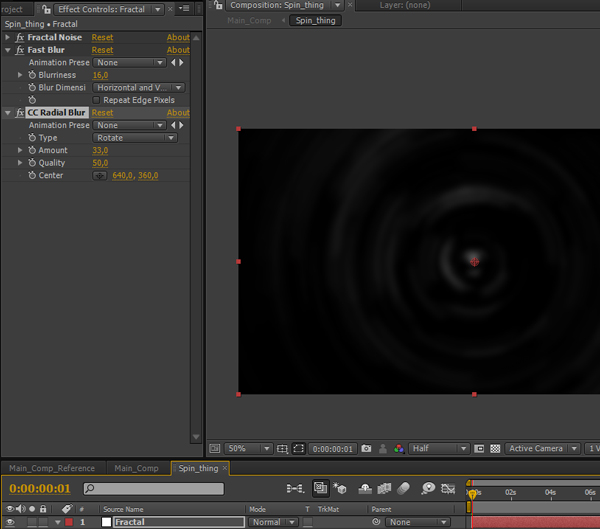
Now, the idea is to take that Fractal Noise and distort so it gain’s a circular look.
To get that effect we’ll use CC Radial Blur but first, to make it a bit more blurry and not as sharp, apply Fast Blur to Fractal layer and set its Bluriness to 16.
After that, apply CC Radial Blur. Set its type to Rotate and Amount to 33, this gives us a circular distortion which is what we want.
Step 6To get that effect we’ll use CC Radial Blur but first, to make it a bit more blurry and not as sharp, apply Fast Blur to Fractal layer and set its Bluriness to 16.
After that, apply CC Radial Blur. Set its type to Rotate and Amount to 33, this gives us a circular distortion which is what we want.
Next, to give it that blend together look and also the base color, apply Glow effect.
Since Fractal Noise’s pixels are covering only small areas, Glow isn’t affecting them because its Threshold is too big. So lower Glow Threshold way down to 0% - now all pixels, that aren’t black, are being influenced by Glow.
Also, raise Glow Radius to around 85% so it blends better.
Save.
Step 7Since Fractal Noise’s pixels are covering only small areas, Glow isn’t affecting them because its Threshold is too big. So lower Glow Threshold way down to 0% - now all pixels, that aren’t black, are being influenced by Glow.
Also, raise Glow Radius to around 85% so it blends better.
Save.
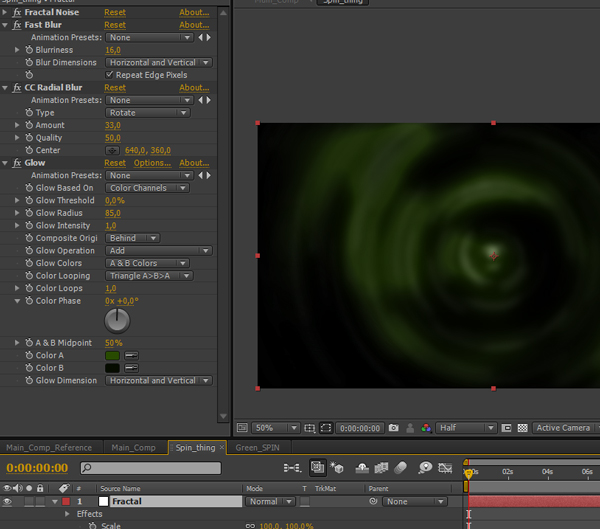
Let’s apply the color inside Glow effect so set Glow Colors to A & B Colors.
Next, you’ll choose colors themselves. I wanted to make it green so I went with following:
Color A - #284A00 and Color B - #060C00
You can choose whatever works for you.
Save.
Step 8Next, you’ll choose colors themselves. I wanted to make it green so I went with following:
Color A - #284A00 and Color B - #060C00
You can choose whatever works for you.
Save.
The colors still looks dim so the last effect that we’ll be applying for Fractal will be Exposure.
Apply and set Exposure to 5.00 and at once you can see how dramatic effect it leaves.
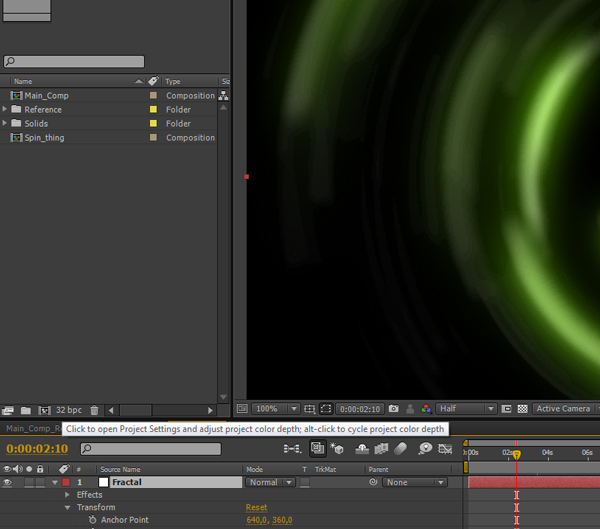
But there’s a problem – zoom in and you’ll notice some ugly looking stuff. That’s because of lacking color depth, presuming you haven’t changed it (defaults at 8 bits per channel).
To correct this problem go to File>Project Settings and under Color Settings find Depth and change it to 32 bits per channel. Alternatively you can Alt+Click on BPC icon on Project panel.
Save.
Step 9Apply and set Exposure to 5.00 and at once you can see how dramatic effect it leaves.
But there’s a problem – zoom in and you’ll notice some ugly looking stuff. That’s because of lacking color depth, presuming you haven’t changed it (defaults at 8 bits per channel).
To correct this problem go to File>Project Settings and under Color Settings find Depth and change it to 32 bits per channel. Alternatively you can Alt+Click on BPC icon on Project panel.
Save.
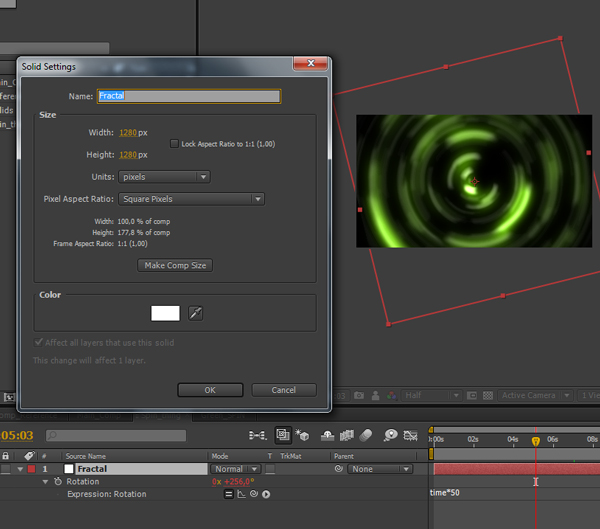
Scrub through timeline and see that there’s something missing – the actual spinning.
Open layer’s Rotation and Alt+click on its stopwatch. Type time*50
Now, there’s one more thing missing, Fractal layer isn’t tall enough to fit into composition. Change that by going to Layer>Solid Settings and change the Height to 1280. It still doesn’t fit completely but you don’t need it since we need only a part from it.
Save.
Step 10Open layer’s Rotation and Alt+click on its stopwatch. Type time*50
Now, there’s one more thing missing, Fractal layer isn’t tall enough to fit into composition. Change that by going to Layer>Solid Settings and change the Height to 1280. It still doesn’t fit completely but you don’t need it since we need only a part from it.
Save.
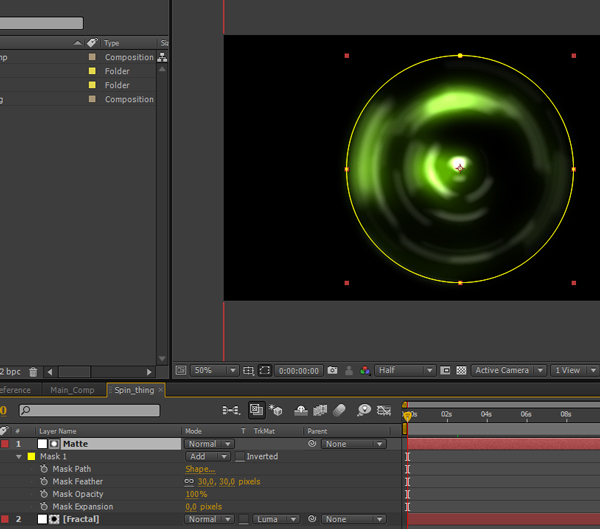
To cut the unnecessary you’ll have to create a track matte (you can’t use regular mask because feathering doesn’t work due to applied effects).
Basicly create a new, white solid and draw a round mask on it with a size you need.
Set its feather to around 30.
Then select Fractal layer and set its track-matte to Luma Matte.
Save.
At this point, I strongly recommend you to pre-render this element because later it can save tons of render time (don’t forget to add alpha channel by setting Millions of Colors+)
Step 11Basicly create a new, white solid and draw a round mask on it with a size you need.
Set its feather to around 30.
Then select Fractal layer and set its track-matte to Luma Matte.
Save.
At this point, I strongly recommend you to pre-render this element because later it can save tons of render time (don’t forget to add alpha channel by setting Millions of Colors+)
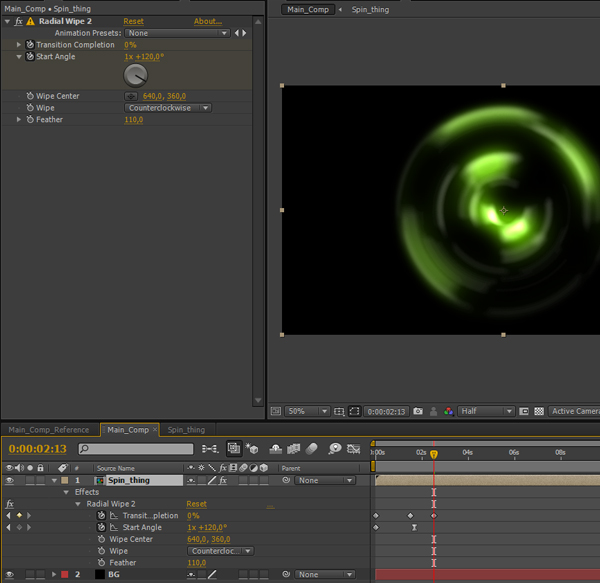
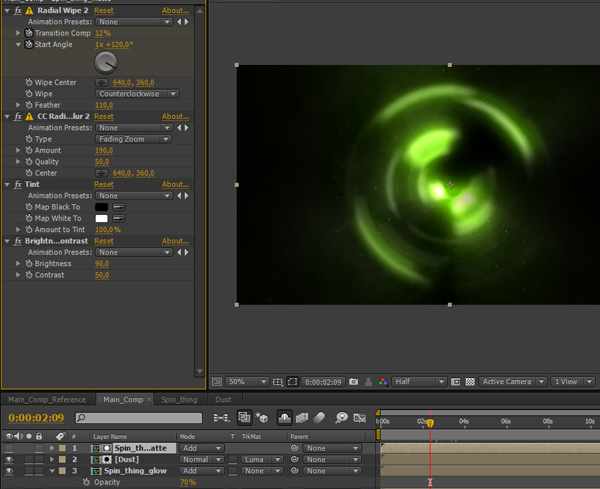
Get back to Main_Comp. Apply Radial Wipe (Transition>Radial Wipe) effect to Spin_thing layer. We’ll animate the revealing of our ring. Set the timeline marker to frame 0. Next, set keyframes for Transition Completion (with value 100%) and for Start Angle (with value 120 degrees). Also change Wipe to Counterclockwise.
Go to 01:12 in timeline and set keyframe for Transition Completion with value 80%
Go to 01:17 and set Star Angle to 1x +120 degrees so there would be one full revolution. Also set it as Easy Ease keyframe (F9).
Go to 02:13 and set Transition Completion to 0%
You can animate this on your own also, depending on how you want to reveal it.
Lastly, set Feather to 110.
Save.
Step 12Go to 01:12 in timeline and set keyframe for Transition Completion with value 80%
Go to 01:17 and set Star Angle to 1x +120 degrees so there would be one full revolution. Also set it as Easy Ease keyframe (F9).
Go to 02:13 and set Transition Completion to 0%
You can animate this on your own also, depending on how you want to reveal it.
Lastly, set Feather to 110.
Save.
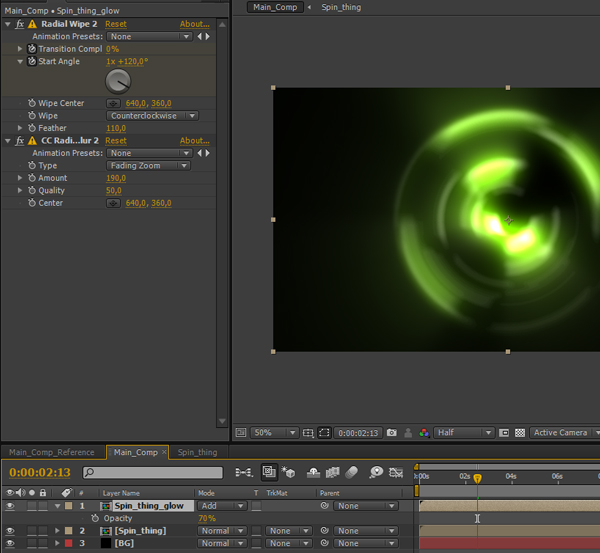
Now we’re going to add that cool looking glow and light rays. It’s super easy.
Duplicate Spin_thing layer and recall the upper one Spin_thing_glow. Set its Blending Mode to Add.
Apply CC Radial Blur again, set its Type to Fading Zoom and Amount to 190.
Bring down the Opacity for Spin_thing_glow to 70% so the glow would be a little less harsh.
Step 13Duplicate Spin_thing layer and recall the upper one Spin_thing_glow. Set its Blending Mode to Add.
Apply CC Radial Blur again, set its Type to Fading Zoom and Amount to 190.
Bring down the Opacity for Spin_thing_glow to 70% so the glow would be a little less harsh.
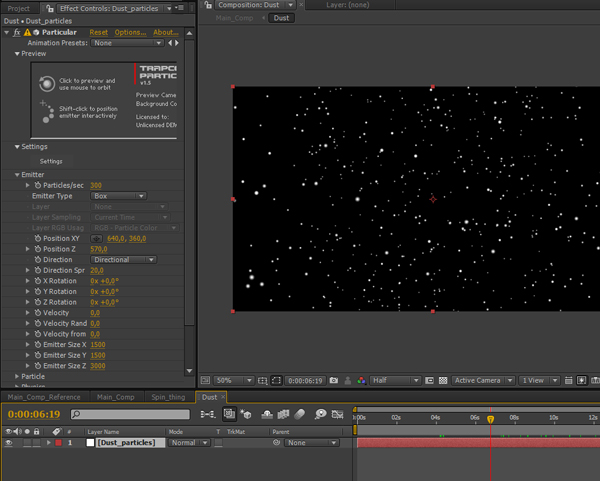
Let’s start with that dust you can see on preview. Make a new solid and call it Dust_particles. Then Precompose it and call the comp Dust. Open it.
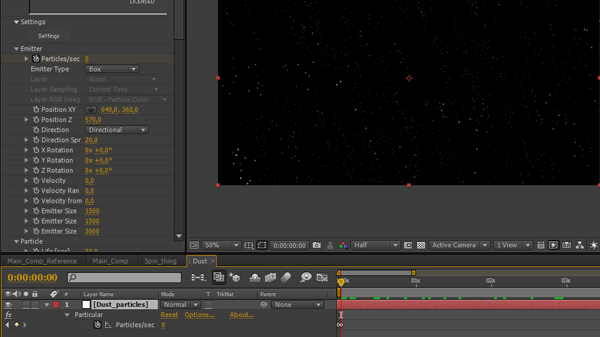
Apply Particular to Dust_particles. Change Particles/sec to 300, Emitter Type to Box and Direction to Directional. Bring down all 3 Velocity values to 0 as we want them to move super slowly.
Next change Emitter Sizes X and Y to 1500 so it fits the screen and Emitter Size Z to 3000 so there would be a depth.
Now, you don’t want them to be near so set Position Z to 570.
Save.
Step 14Apply Particular to Dust_particles. Change Particles/sec to 300, Emitter Type to Box and Direction to Directional. Bring down all 3 Velocity values to 0 as we want them to move super slowly.
Next change Emitter Sizes X and Y to 1500 so it fits the screen and Emitter Size Z to 3000 so there would be a depth.
Now, you don’t want them to be near so set Position Z to 570.
Save.
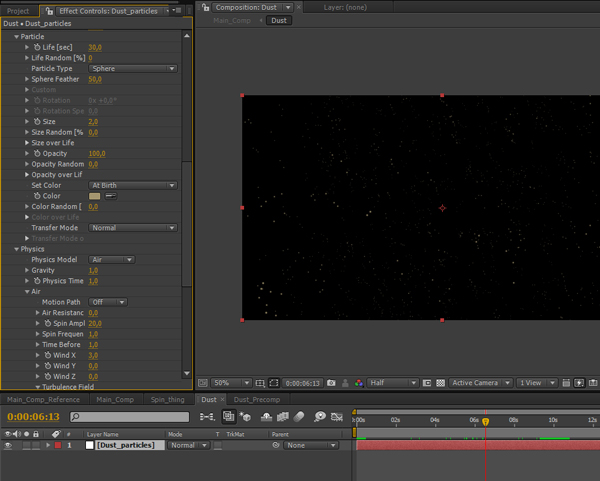
Go to Particle submenu and set hers Life to 30 seconds and Size to 2. Also set the color to beige or something similar.
Go to Physics and set Gravity to 1. Open Air pull-down and change Spin Amplitude to 20. It’ll give particles a random movement. Lastly, set Wind X to 3 so they wouldn’t fall straight.
Save.
Step 15Go to Physics and set Gravity to 1. Open Air pull-down and change Spin Amplitude to 20. It’ll give particles a random movement. Lastly, set Wind X to 3 so they wouldn’t fall straight.
Save.
As you scrub through timeline, you can see that new particles are being born all the time. We’ll use a little keyframing to stop them from emitting.
Go through timeline and find a place where you think there are enough particles. For me it was at 9:00.
Now switch back to Effects Control and click the stopwatch to create a keyframe. Then press PageDown or just go 1 frame forward and set Particles/sec to 0.
After this, offset the layer in timeline so the point where particles don’t emit anymore would be at 00:00.
Save.
Step 16Go through timeline and find a place where you think there are enough particles. For me it was at 9:00.
Now switch back to Effects Control and click the stopwatch to create a keyframe. Then press PageDown or just go 1 frame forward and set Particles/sec to 0.
After this, offset the layer in timeline so the point where particles don’t emit anymore would be at 00:00.
Save.
It doesn’t look dusty enough. Well, we can change that easily.
First, duplicate Dust_particles layer and recall the lower one Dust_blur.
Apply Fast Blur to Dust_blur and set its Bluriness to 20.
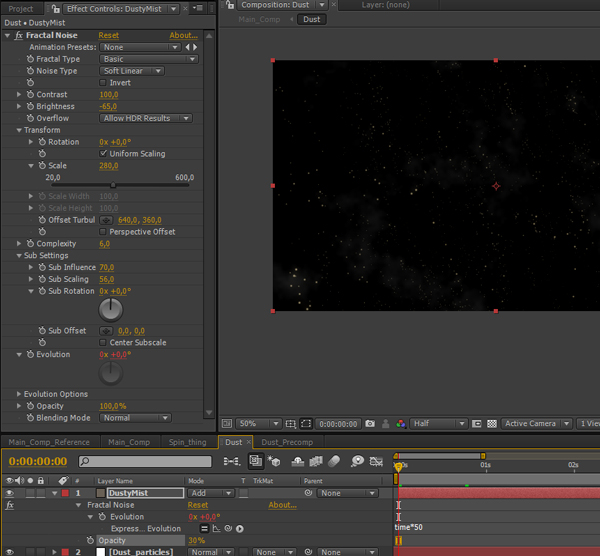
Then create a new solid and call it DustyMist, apply Fractal Noise to it.
Again, we want only some areas visible so bring Brightness down to -65.
Under Transform increase Scale value to 280.
At last, apply time*50 expression to Evolution.
Set layer’s Blending Mode to Add and Opacity to 30%.
Save.
Step 17First, duplicate Dust_particles layer and recall the lower one Dust_blur.
Apply Fast Blur to Dust_blur and set its Bluriness to 20.
Then create a new solid and call it DustyMist, apply Fractal Noise to it.
Again, we want only some areas visible so bring Brightness down to -65.
Under Transform increase Scale value to 280.
At last, apply time*50 expression to Evolution.
Set layer’s Blending Mode to Add and Opacity to 30%.
Save.
Get back to Main_Comp. What we need now is to make dust when our ring illuminates the scene. To do so, duplicate Spin_thing_glow layer and put it directly above Dust because it’ll serve as a track matte. Recall it Spin_thing_matte.
Next, we need to make matte layer black and white so Luma matte can be applied.
Do this by applying Tint effect. It’s not bright enough. Apply Brightness & Contrast (under Color Correction). Set its values to Brightness 90 and Contrast 50.
Now you can set Dust’s Track-Matte to Luma Matte. Set Dust layer’s Blending Mode to Add!
Save.
Step 18Next, we need to make matte layer black and white so Luma matte can be applied.
Do this by applying Tint effect. It’s not bright enough. Apply Brightness & Contrast (under Color Correction). Set its values to Brightness 90 and Contrast 50.
Now you can set Dust’s Track-Matte to Luma Matte. Set Dust layer’s Blending Mode to Add!
Save.
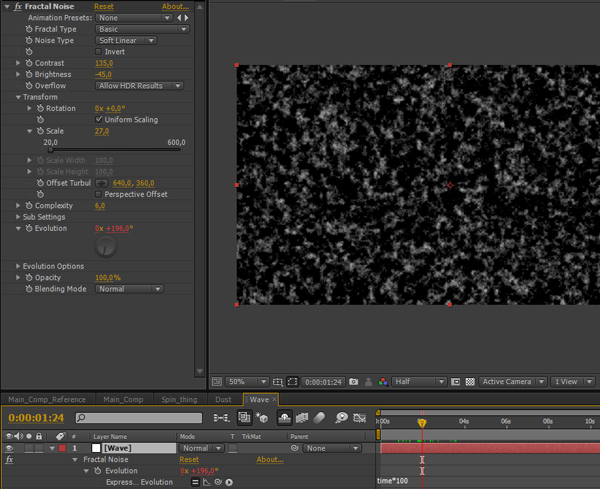
Next element is that wave coming from ring when it fully reveals. Make a new solid and Precompose it. Call it Wave. Open it.
Apply Fractal Noise to the layer and set its Contrast to 135 and Brightness to -45. Change Scale to 27. Apply time*100 expression to Evolution.
Return to Main_Comp.
Save.
Step 19Apply Fractal Noise to the layer and set its Contrast to 135 and Brightness to -45. Change Scale to 27. Apply time*100 expression to Evolution.
Return to Main_Comp.
Save.
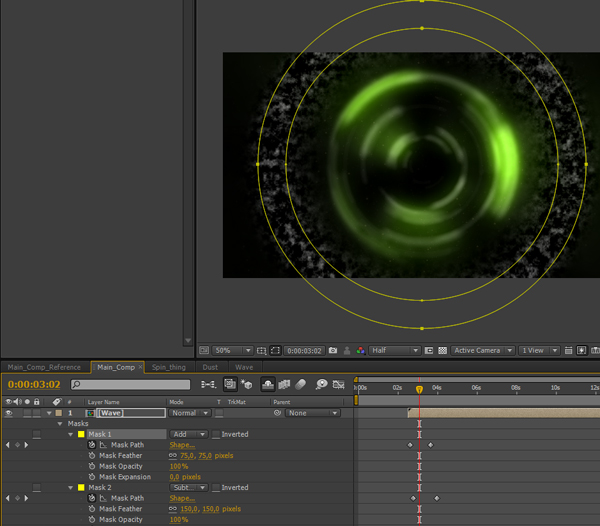
Position Wave layer where you want wave to start. Now you’ll have to work on your own a little and animate two masks in the same way the wave in preview movies. See the screenshot. Don’t forget to set Mask Feather – for outer mask to 75 and for inner – 150.
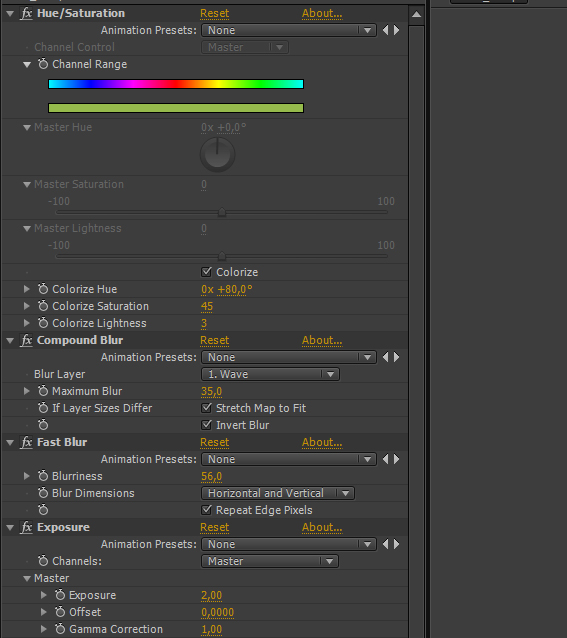
Step 20Apply the effects listed in screenshot. Set similar settings and choose a hue depending on your ring’s color if you’ve chosen something other than green.
Change Wave layer’s Blending mode to Add.
Step 21Change Wave layer’s Blending mode to Add.
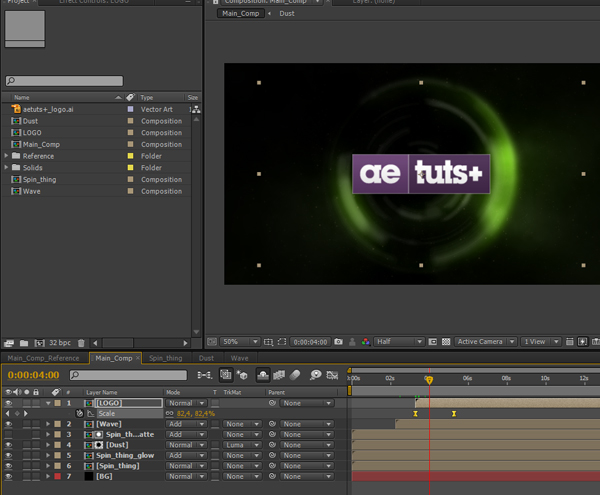
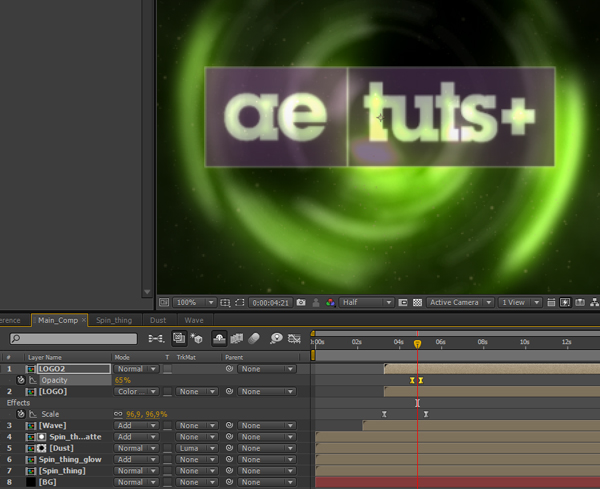
The only thing left is the reveal of our logo. Place it inside Main_Comp and Precompose it.
Then position LOGO composition to where you want to reveal it.
First, you’ll animate its Scale properties so it would scale gradually. I animated it to scale from 75% to 100% over 2 seconds. Easy Ease both keyframes. Save.
Step 22Then position LOGO composition to where you want to reveal it.
First, you’ll animate its Scale properties so it would scale gradually. I animated it to scale from 75% to 100% over 2 seconds. Easy Ease both keyframes. Save.
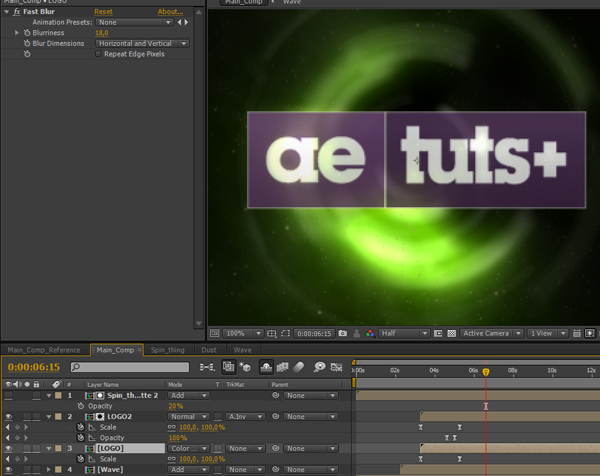
Then you have to duplicate it. Call the upper one LOGO2.
Next you have to change Blending mode for LOGO to Color Dodge. Also apply Fast Blur with Bluriness at 18.
Highlight LOGO2. You don’t want to see the full logo now so bring down its Opacity to 0%.
Position your timeline marker to place around 15 frames before Scale reaches 100%.
There set a keyframe for Opacity at value 0%. Move some 15 frames forward and set Opacity keyframe at 100%. Easy Ease both of them. Save.
Step 23Next you have to change Blending mode for LOGO to Color Dodge. Also apply Fast Blur with Bluriness at 18.
Highlight LOGO2. You don’t want to see the full logo now so bring down its Opacity to 0%.
Position your timeline marker to place around 15 frames before Scale reaches 100%.
There set a keyframe for Opacity at value 0%. Move some 15 frames forward and set Opacity keyframe at 100%. Easy Ease both of them. Save.
To stylize the look of logo a bit duplicate Spin_thing_matte layer and bring it above LOGO2.
Then select LOGO2 and set its track-matte to Alpha Inverted. Also bring down Spin_thing_matte 2’s Opacity to 20%. Save.
Step 24Then select LOGO2 and set its track-matte to Alpha Inverted. Also bring down Spin_thing_matte 2’s Opacity to 20%. Save.
Now you should apply Radial Wipe transition to LOGO layer so it doesn’t just pop up from nowhere (you can also animate its opacity for a fade in).
Set Radial Wipe’s feather to 50. Further you can set Transition Completion animation on your own. Again, you should use Easy Ease for smoother transition. Save.
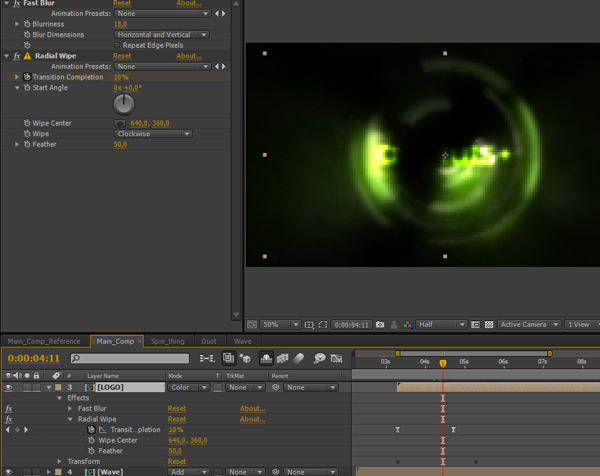
Step 25Set Radial Wipe’s feather to 50. Further you can set Transition Completion animation on your own. Again, you should use Easy Ease for smoother transition. Save.
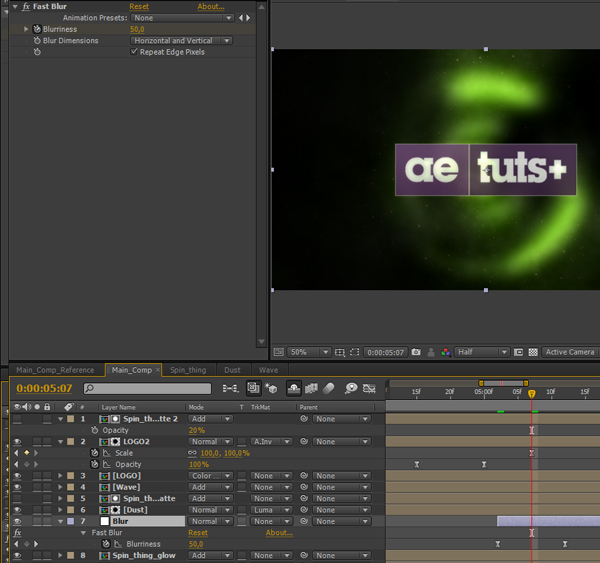
The last thing you should do in this composition is tom make that “out of the focus” background once logo has appeared. To do that, create new Adjustment Layer and call it Blur. Place it beneath Dust layer so nothing above gets blurred. Then offset it where you want blurring to start and animate it by keyframing Bluriness from 0 to 100 over around 10 frames. Don’t forget to tick Repeat Edge Pixels.
Save.
Step 26Save.
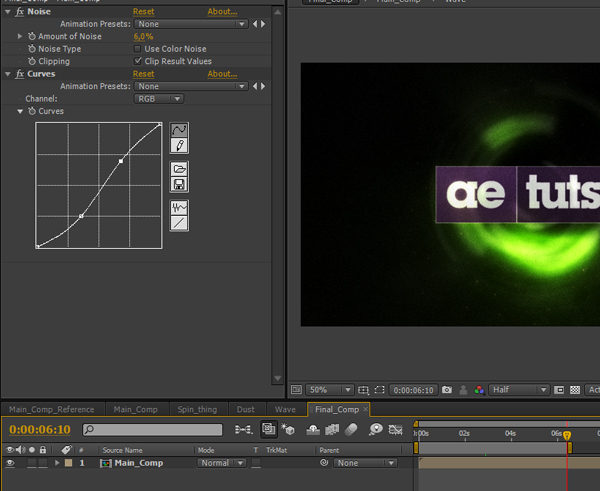
What’s left is some color correction. Precompose the whole Main_Comp into a new composition. Call it Final_Comp. For a more cinematic look, apply Noise effect. Set it to 6% and untick Use Color Noise. Set up a Curve effect too and draw a little contrast curve.
Congrats, you’re done!
Reminder: If you decide to make a camera animation, for instance zooming, don't forget to check Collapse Transformations for Dust layer to preserve particle detail.
منقول
Congrats, you’re done!
Reminder: If you decide to make a camera animation, for instance zooming, don't forget to check Collapse Transformations for Dust layer to preserve particle detail.
منقول
تعليق