
 تويت
تويت
Video Tutorial
Our video editor Gavin Steele has created this video tutorial to compliment this text + image tutorial.
Step 1
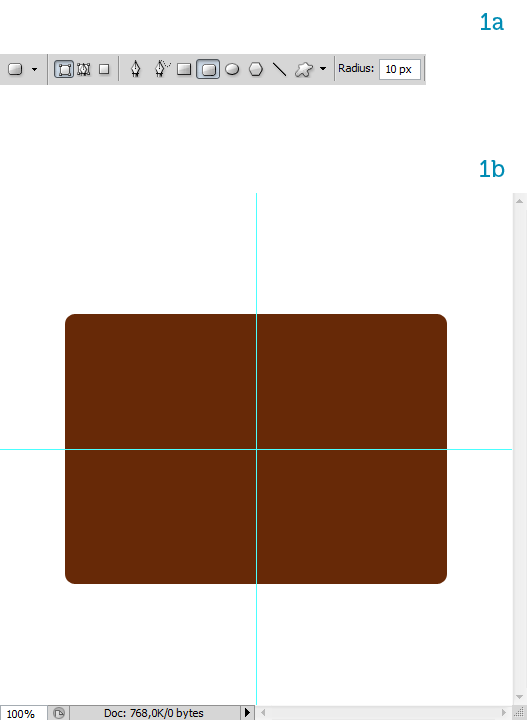
Let's start by creating a new RGB blank document, choosing a 512 px square canvas. Activate Snap from the View Menu (Shift + Command + Semicolon key). Set up two guides to mark the center of the canvas.
Select the Rounded Rectangle Tool (U), choose Shape Layer and set the Radius to 10 px in the Options bar (1a). Draw a brown rectangle by Alt-clicking and dragging from the center of the canvas (1b). This is the briefcase's main body, so name it "main."
Step 2
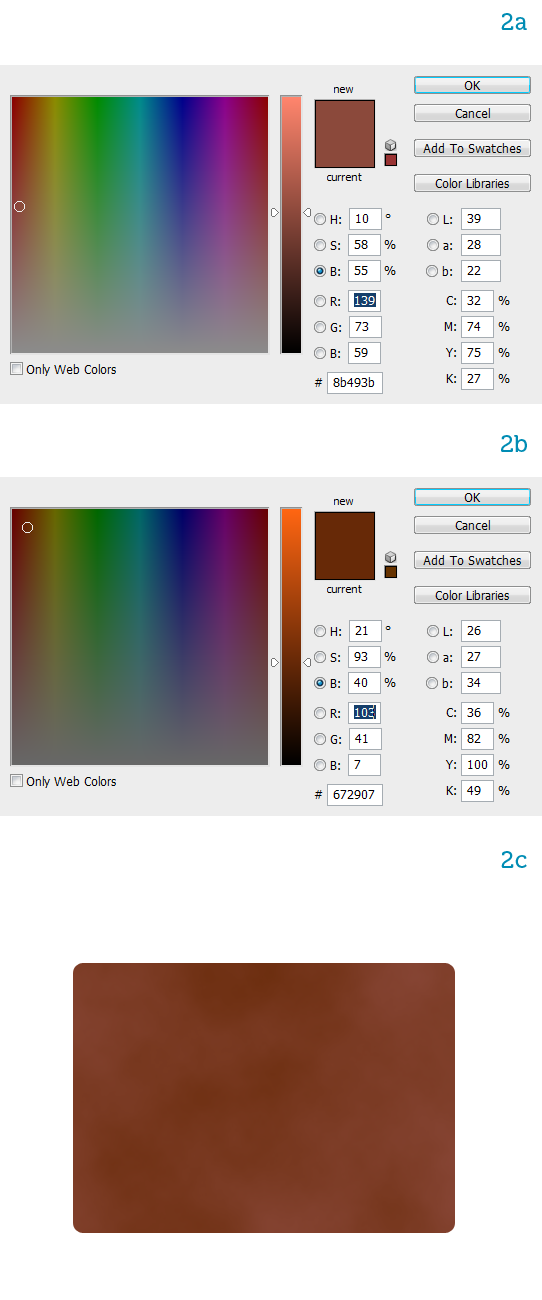
Let's achieve a higher realism by introducing some color variation. Set up the foreground (2a) and background (2b) colors to brown hues, then go to Filter > Render > Clouds. This will create an irregular stain pattern with the two colors that simulates leather's natural color variation (2c).
Step 3
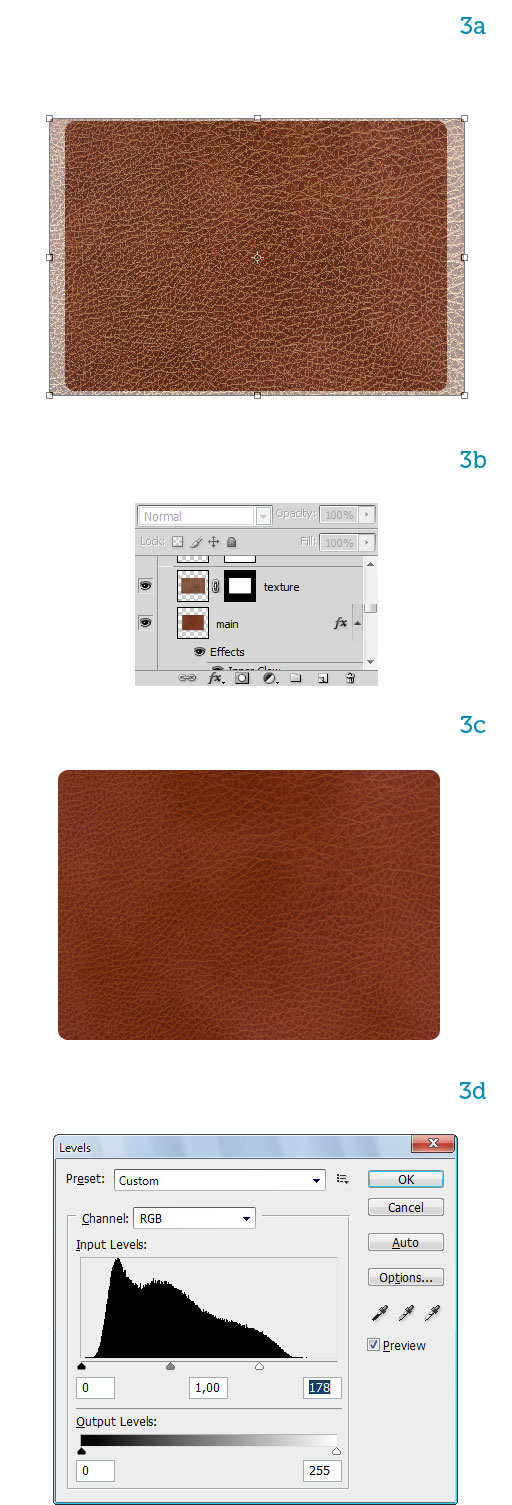
Let's add a real leather texture. Download this image and place it in the document, naming its layer "texture." Scale it down proportionally until it's slightly bigger than the briefcase (3a). Command-click the "main" layer to select its pixels then add the selection as a mask to the texture (3b).
Set its blending mode to Soft Light and reduce the Opacity to 50% (3c). It looks a bit dull, doesn't it? Let's add some life to it. First bring up Levels by entering Command + L and move the right-hand slider closer to the center (3d). This raises the white levels, making the texture look brighter.
Step 4
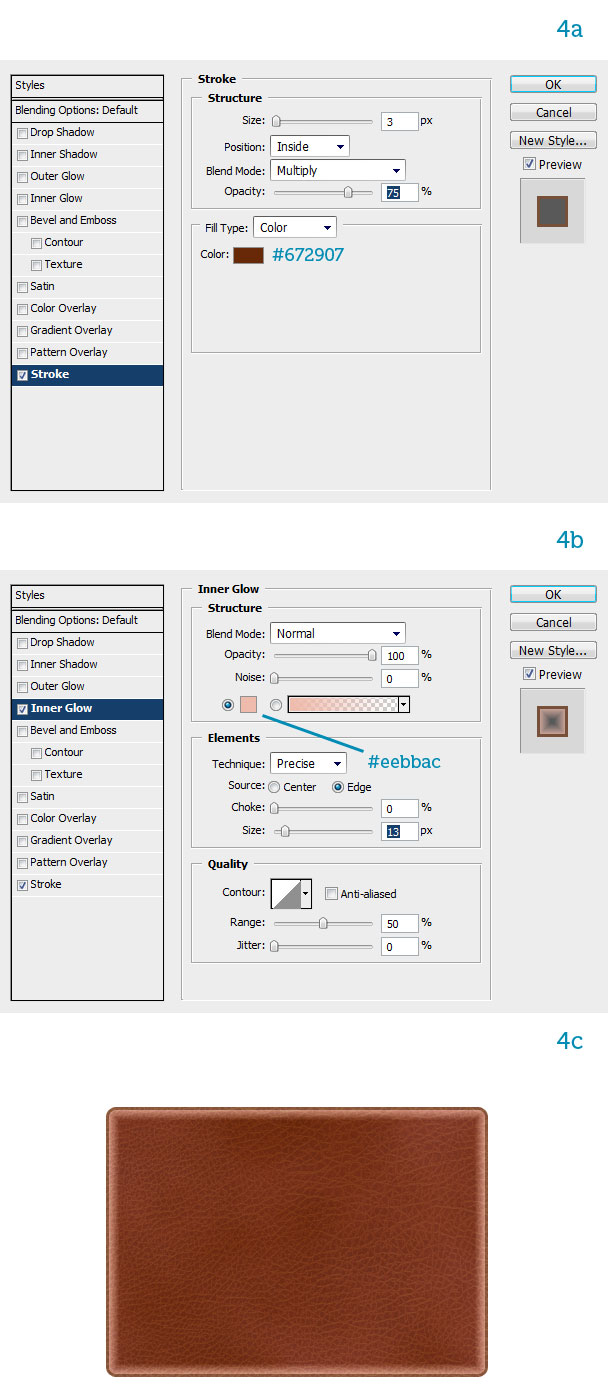
Now select the "main" layer and double-click on it to bring up the Layer Style window. First add a dark brown Stroke to mark the perimeter (4a), then Inner Glow to simulate concavity around the edges (4b). It looks better already (4c).
Step 5
Now duplicate the layer and scale it down, clearing all styles (5a). Add an Inner Glow style to simulate a full pocket (5b). The hard edge is wrong, though, so go to Filter > Blur > Gaussian Blur and choose 3 px. Now there's a smooth color transition (5c). Now back to the "main" layer, add a Gradient Overlay to darken the top part as it is shadowed by the flap that we'll draw later (5d).

Step 6
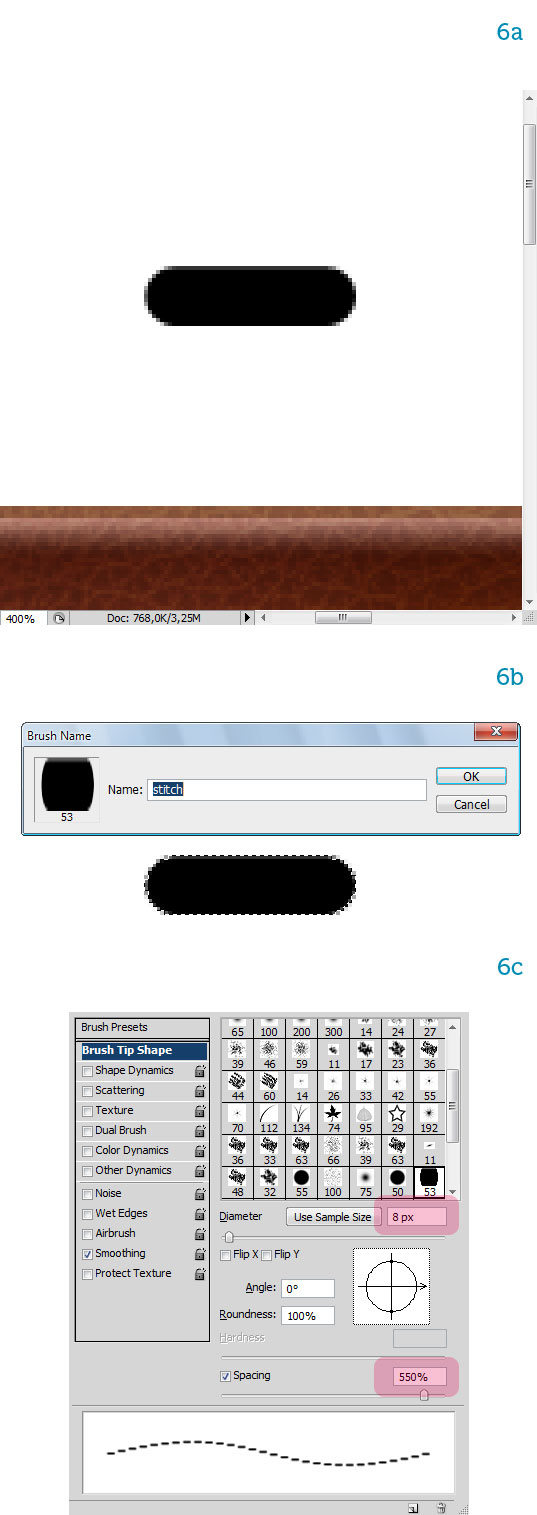
Now we'll use a clever technique to create the stitches. Draw a small rounded rectangle (6a), then from the Edit menu choose Define Brush Preset and name the brush "stitch" (6b). You can erase the rectangle now.
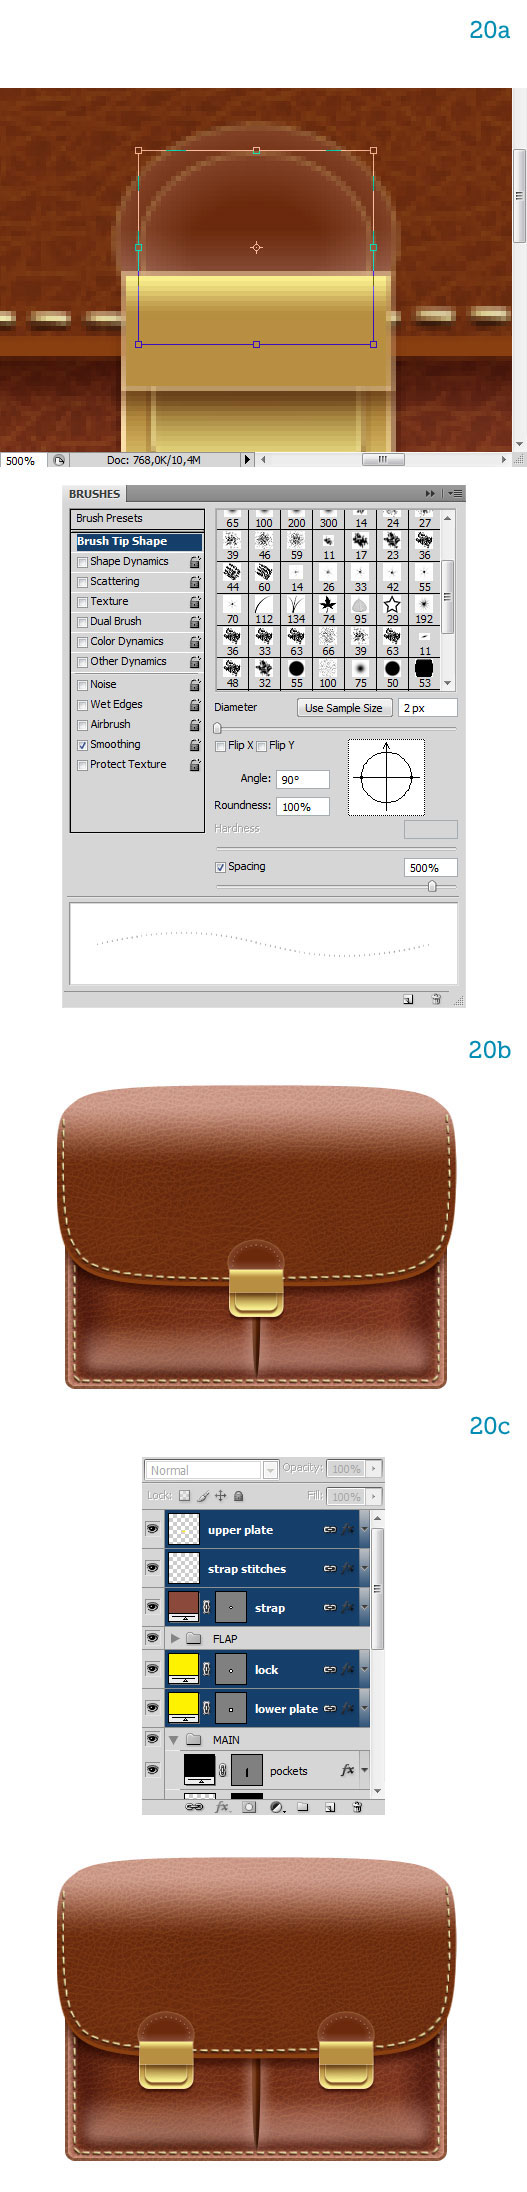
In the Brushes palette set the brush's properties. Set its Diameter to 8 px and the Spacing to 550% (6c). These values were found by trial and error using the preview at the bottom of the palette. The brush is ready to be put to good use.
Step 7
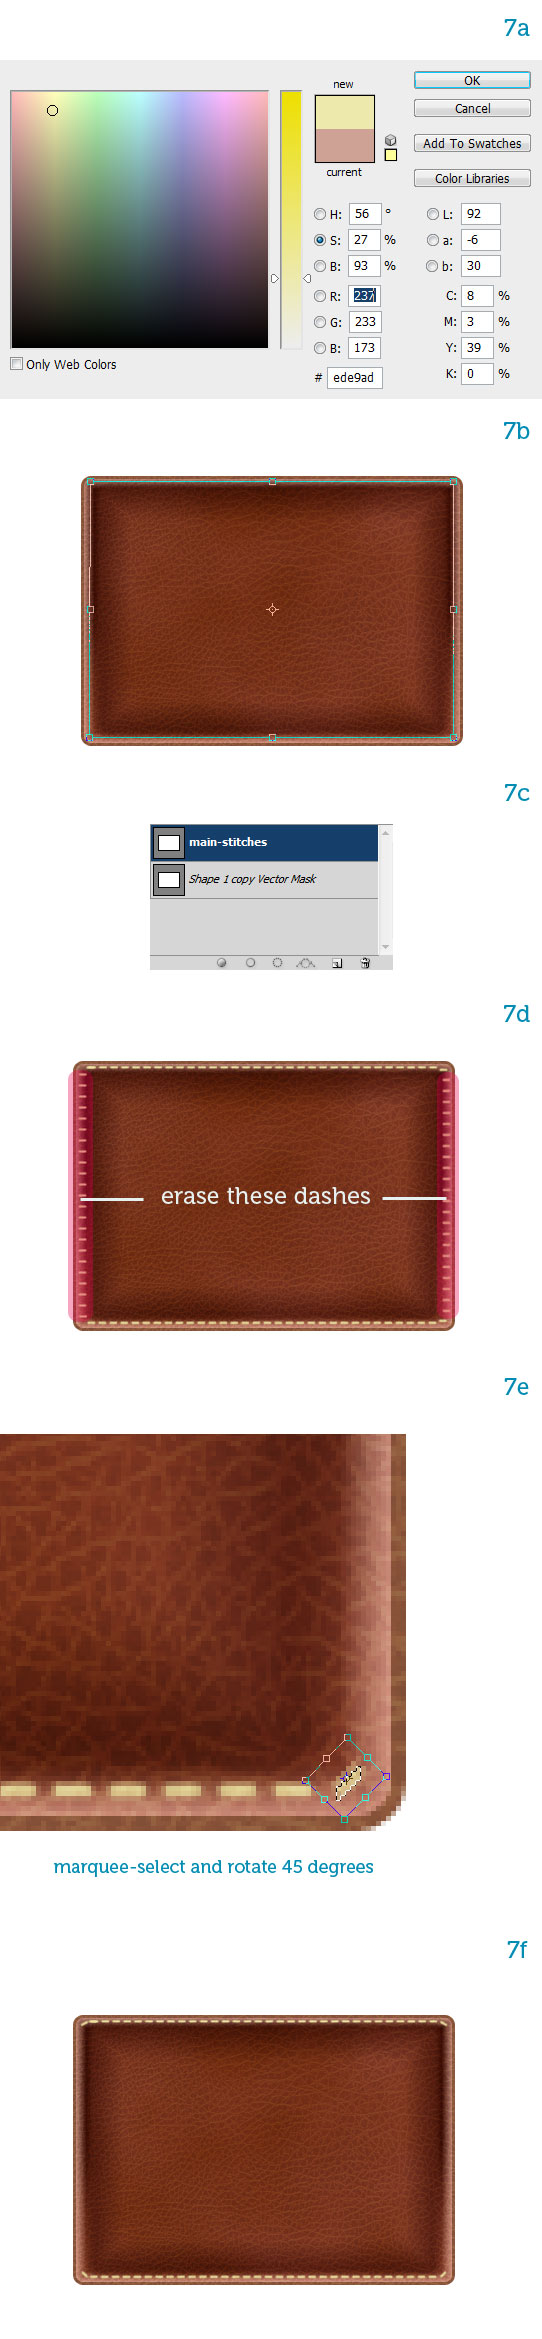
Choose a pale yellow color for the stitches (7a). Now create a rounded rectangle (choose the Path option for the Rounded Rectangle Tool) sized between the "main" and "main copy". The stitches will run along this path (7b). In the Paths palette you'll see the path you just created, double-click on its generic name and enter "main-stitches" (7c).
Now create a new layer and make sure it's selected. Back to the Paths palette, right-click on the "main-stitches" path and select Stroke Path. A dialog will pop-up. Choose the Brush Tool and uncheck the Simulate Pressure option if it's not already. Here's the result (7d).
As you can see, the brush doesn't conform to the path so the little dashes are always horizontal. We need to erase the vertical sides. Then marquee-select the dashes at the corners and rotate them 45 degrees (7e, 7f). It's OK if they don't look symmetrical, as that looks more natural.
Step 8
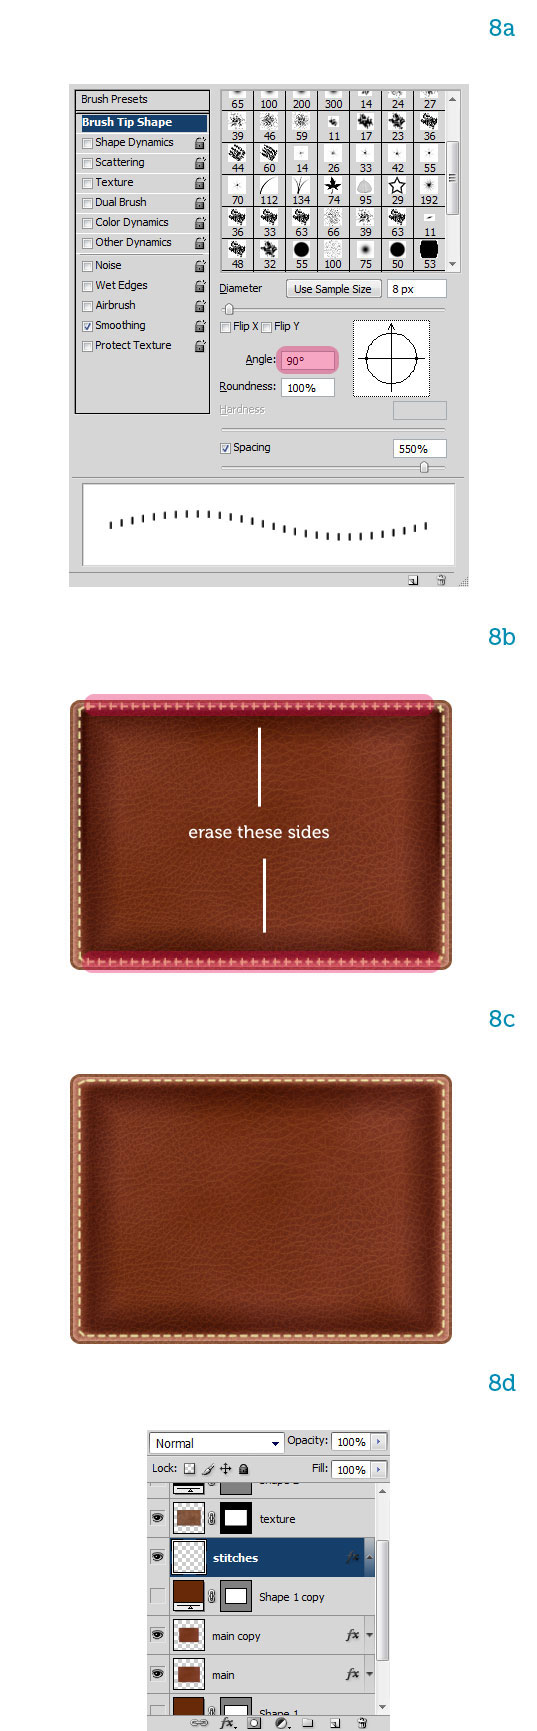
We need to create a new layer now and stroke the path again to create the missing sides. Hit B to select the Brush Tool, then F5 to open the Brush palette, and rotate the "stitch" brush 90 degrees. See in the preview window that the dashes are now vertical, that is perpendicular to the path (8a). Just like we did before, stroke the "main-stitches" path on the new layer (8b). Erase the horizontal sides and you should be finished (8c). You can merge the two layers into one named "stitches" (8d).
Step 9
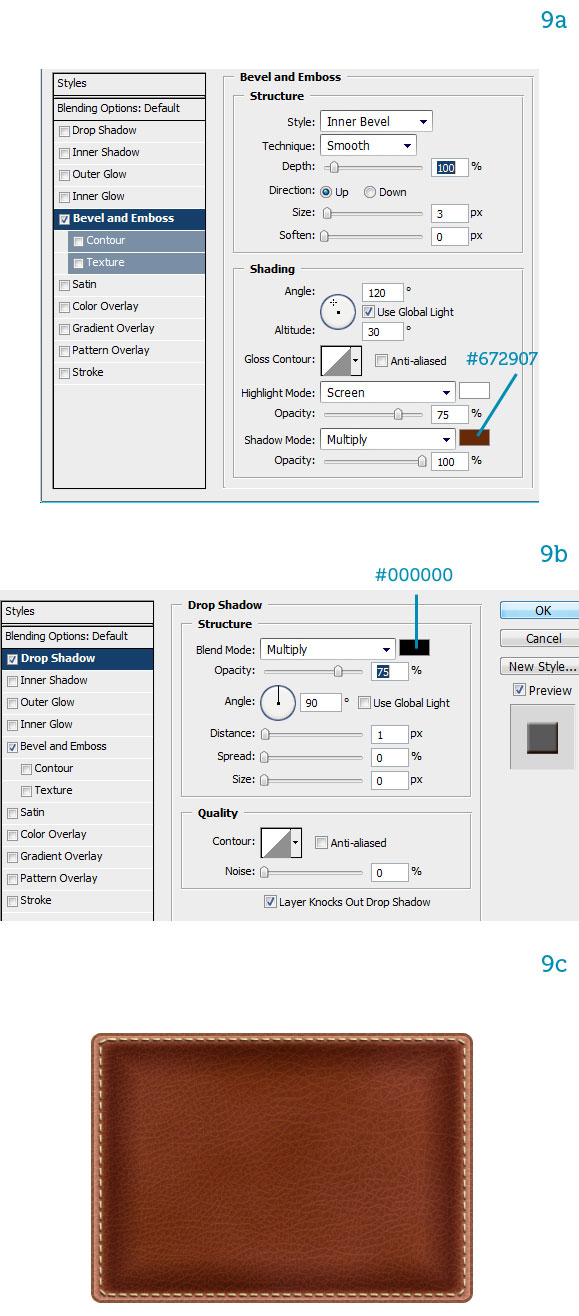
The stitches look flat. Let's add some thickness. First a Bevel and Emboss style (9a) to give the stitches some thickness, then a Drop Shadow (9b). Now they look more realistic (9c).
Step 10
Leather reflects the environment so we need to add ambient reflections. Draw a rounded rectangle near the bottom of the briefcase, choosing a light pink color (10a). Name this layer "ambient reflection," set it to Screen mode, and 40% Opacity (10b).
We need to soften its edges so apply a 3 px Gaussian Blur (10c). Now type Q to enter Quick Mask mode. The colors will change to black and white. Type G to select the Gradient Tool and click-drag vertically to create a black-to-white gradient (10d).
Hit Q again to exit Quick Mask mode and see the gradient turned into a selection: use it to mask the layer and fade out the top of the reflection (10e). At this point you might need to adjust the opacity to 60% and blur again to get a satisfying result (10f).

Step 11
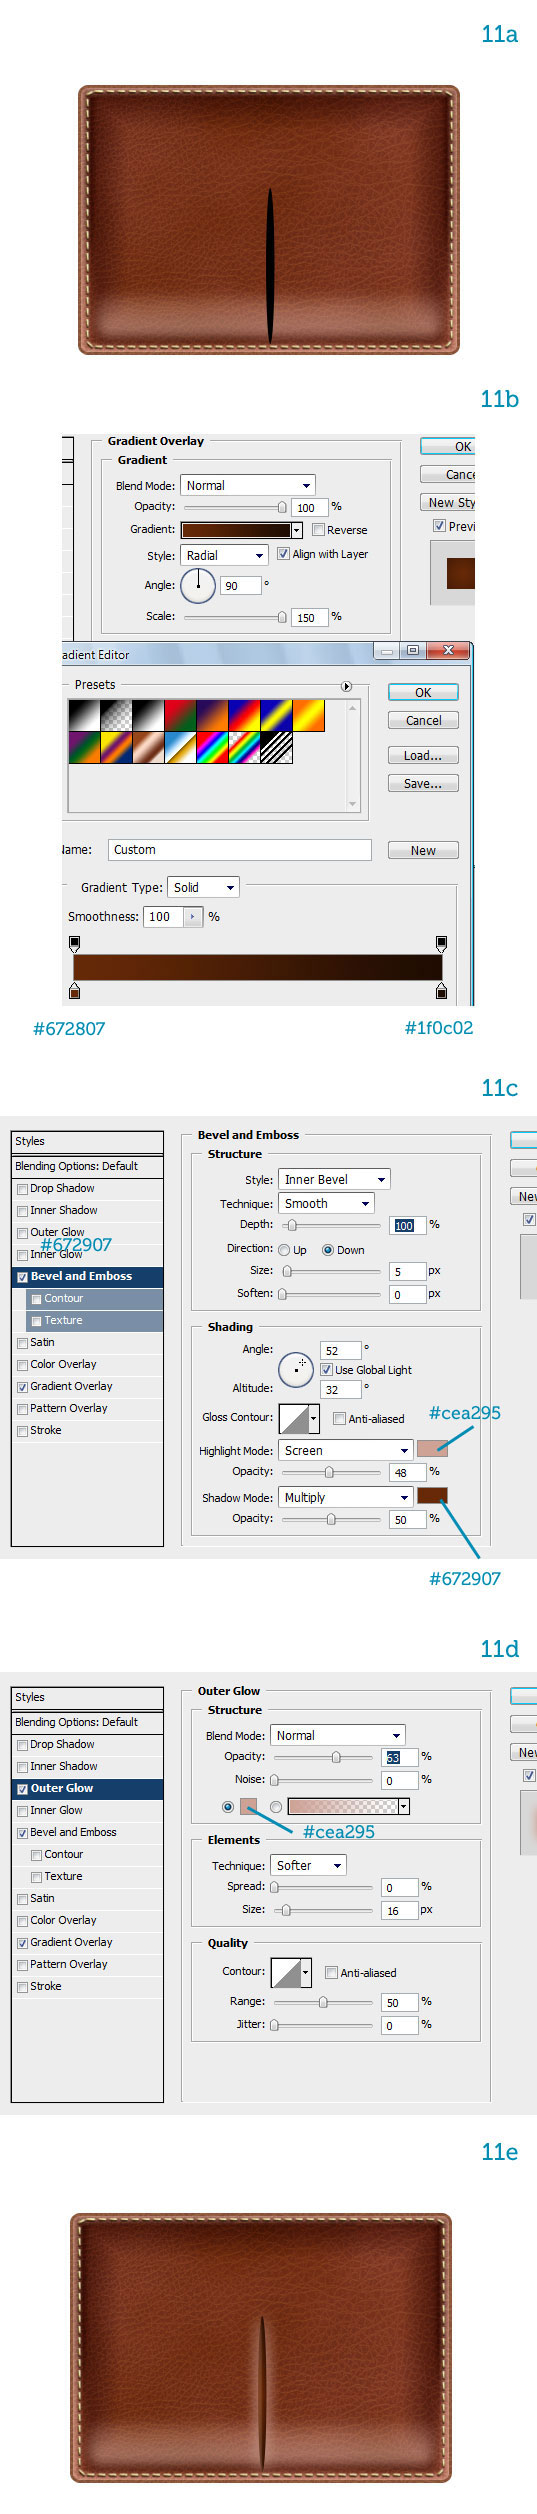
Now let's draw a divider to suggest two pockets. Draw a thin vertical ellipse with the Ellipse Tool (U) smack in the middle (11a). Name it "pockets." We need to make the endpoints darker, imply lighting coming let's say from the right and also add some soft reflections around this slit. Once again layer styles will make the job easy. First add a Gradient Overlay (11b), then Bevel and Emboss (11c) and finally Outer Glow (11d). Very nice, the bottom of the briefcase is complete (11e).
Step 12
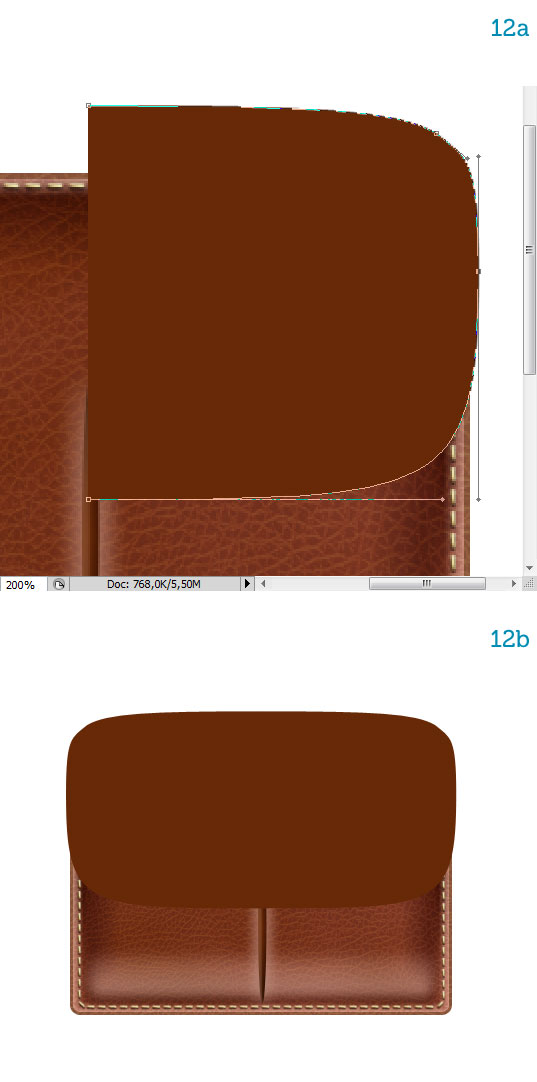
Let's draw the flap. Snap to the center guide and draw the right half of the flap (12a). Duplicate this layer, flip it horizontally and snap it to the left side of the guide (12b). You can adjust the paths until you're satisfied with the shape. Rasterize the layers when you're done. Name this layer "flap."
Step 13
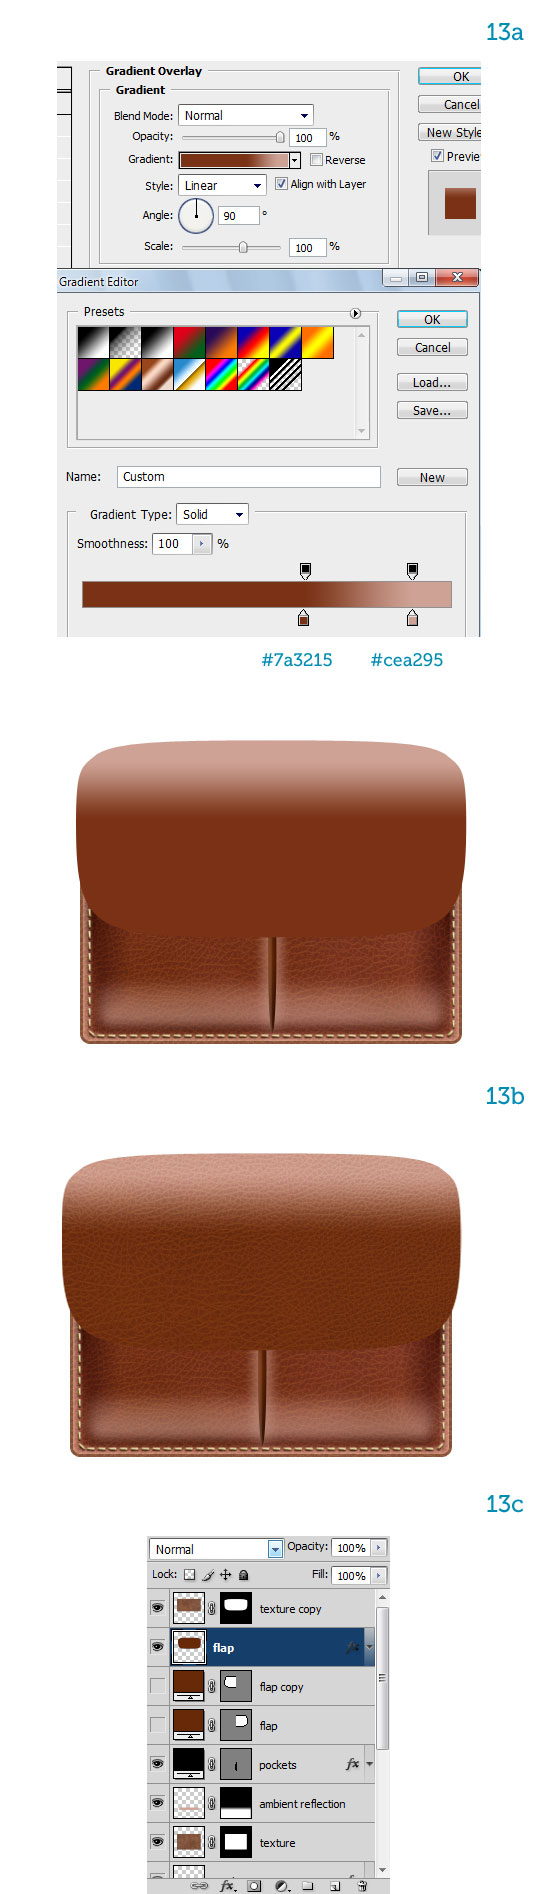
Add a Gradient Overlay style to the flap, making the top part bright, as it is lit (13a). The flap needs a texture too, so duplicate the "texture" layer and move it above the flap. To avoid repetition of the pattern, flip it vertically and squash it to match the flap's proportions (13b). Also use the flap to mask it (13c).
Step 14
The flap needs some thickness. Copy the "flap" layer and move the copy below it, naming it "flap thickness." Move it down a bit (14a). Adjust its Gradient Overlay so it's a bit lighter (14b). The thickness is not textured. Since the flap casts a shadow on the main body, we need to add a Drop Shadow style too (14c).
We only want the shadow to be cast onto the briefcase so we need to mask out the parts that stick out. Right-click on the "flap thickness" and choose Create Layers. This turns the styles into separate layers, masked by their parent (14d). Now Command-click the "main" layer (14e) and use this selection to mask the drop shadow (14f).

Step 15
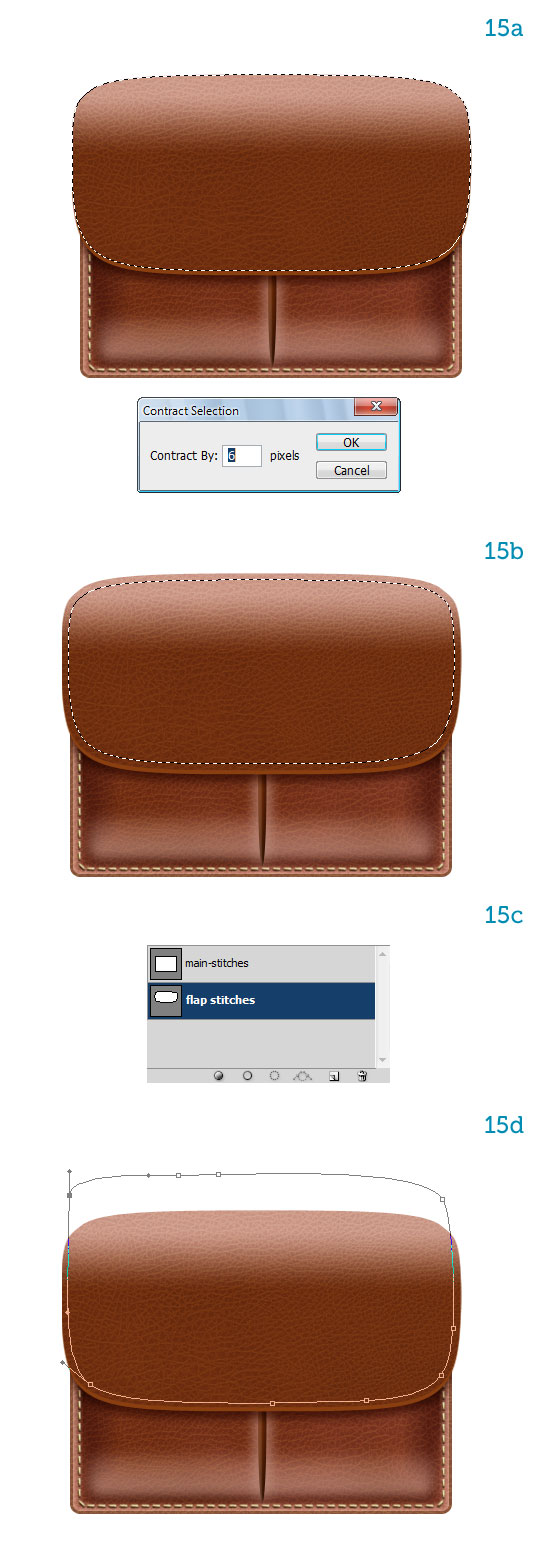
Let's add stitches to the flap. Command-click the "flap" then go to Select > Modify > Contract and choose 6 pixels (15a). How do you know how much to contract the selection? Trial and error, no magic knowledge required (15b).
Create a path from this smaller selection and name it "flap stitches" (15c). With the Direct Selection Tool (A), modify the path so it sticks out from the top. We want to imply that the stitches curve around to the back (15d).
Step 16
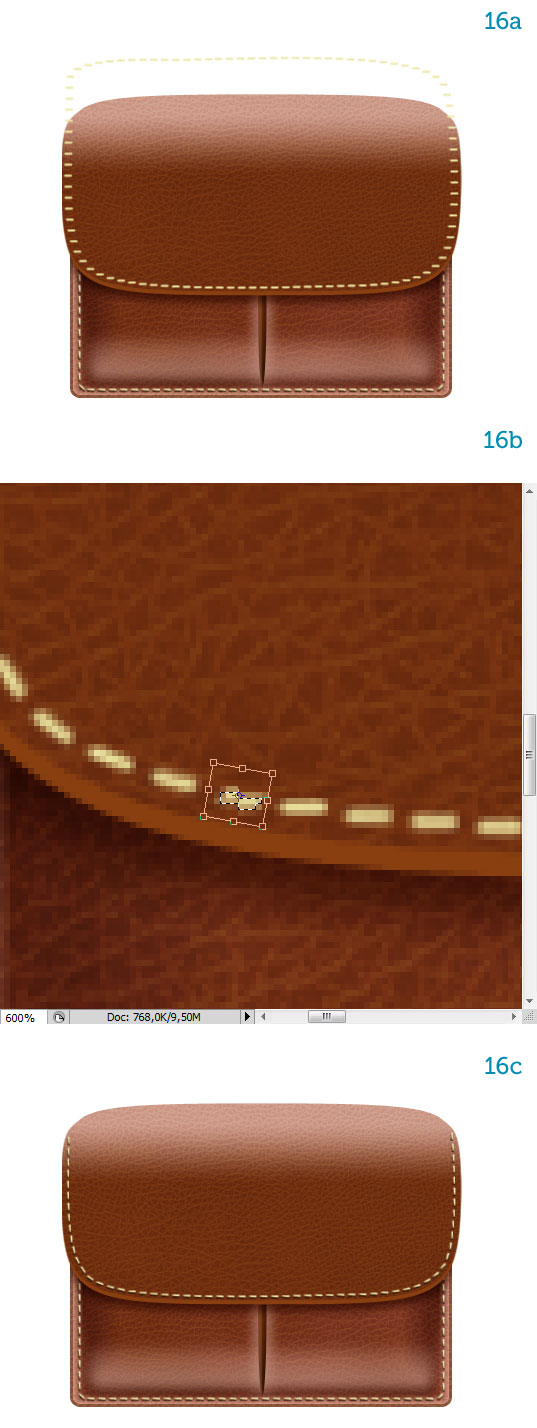
Stroke the path using our custom "stitch" brush with its rotation reverted to 0 degrees (16a). Erase the vertical sides, then manually rotate the dashes around the curved corners so they conform to the flap (16b). On a new layer stroke the path again, this time rotating the brush 90 degrees. Erase the superfluous dashes. Copy and paste the layer styles from the previous stitches (16c).
Step 17
Next up are the locks. Choose a yellow color and draw a rounded rectangle, moving it below the "flap thickness" and naming it "lower plate" (17a). Apply a gold Gradient Overlay (17b), a Drop Shadow (17c) and a Stroke to simulate highlights on the edges (17d).

Step 18
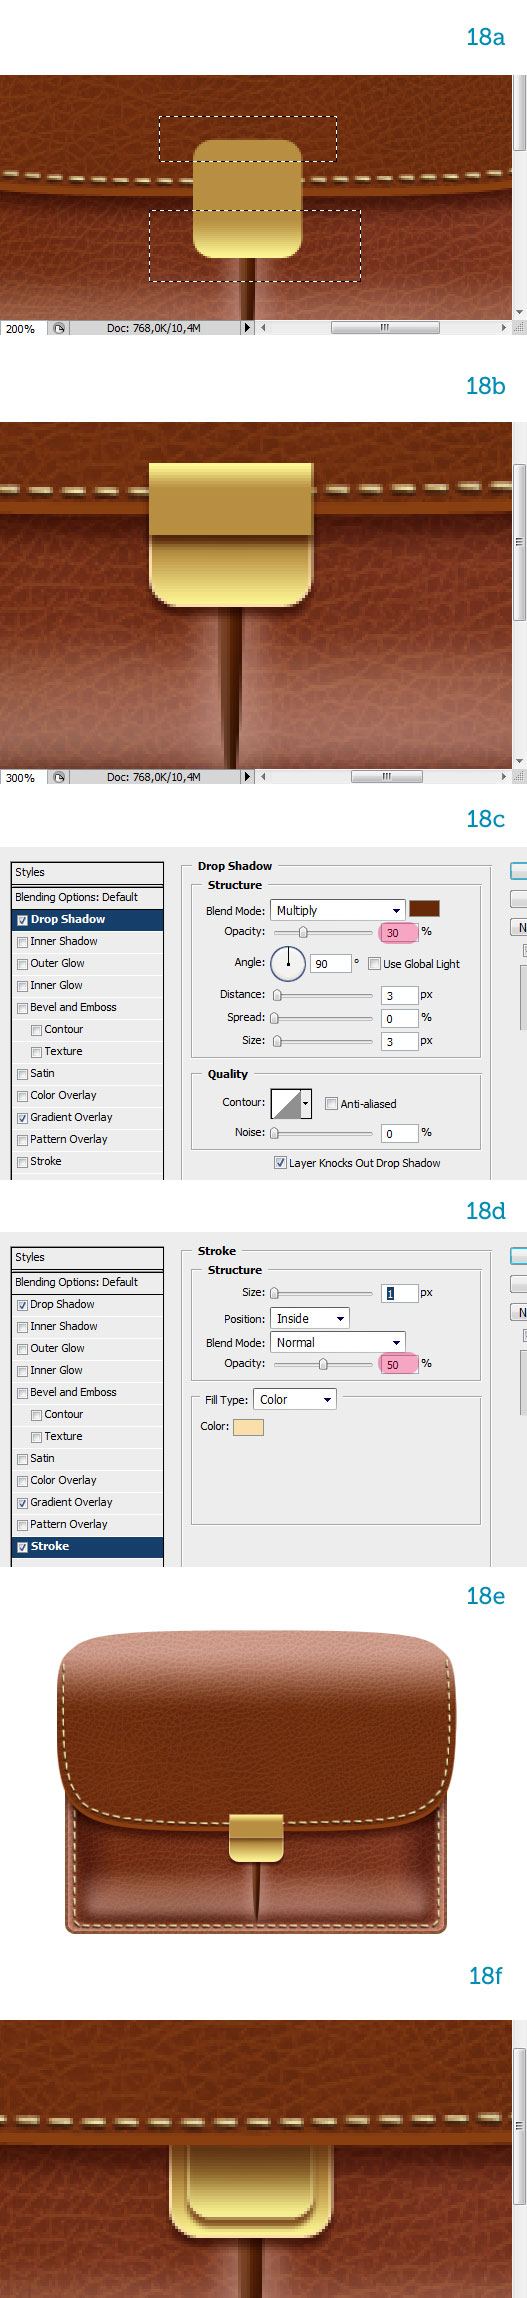
Copy this shape and move it above all layers. Name it "upper plate." Marquee-select the parts in excess and erase them (18a). Open the layer styles and uncheck Reverse from the Gradient Overlay (18b). Reduce the Drop Shadow's Opacity to 30% (18c) and the Stroke's Opacity to 50% (18d). It looks good (18e). Finally make a smaller copy of the "lower plate," name it "lock" and reduce the Stroke's Opacity to 50% (18f).
Step 19
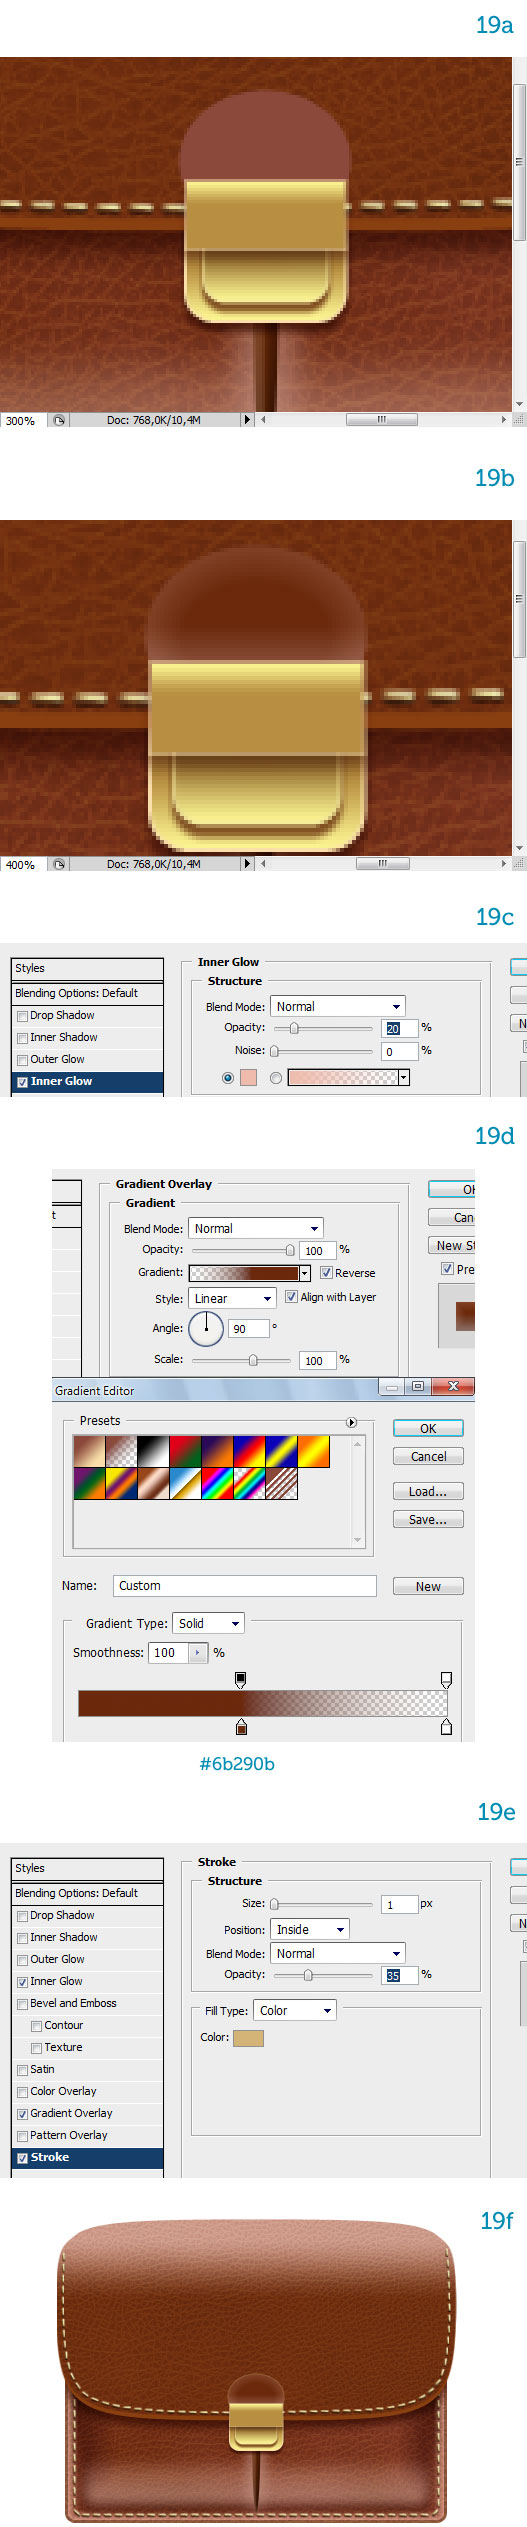
The lock is attached to the flap by means of a short leather strap. Behind the "upper plate" draw a brown ellipse and name it "strap" (19a). Copy and paste the layer styles from the "main" layer (19b). Modify them: reduce the Inner Glow (19c), change the Gradient Overlay color (19d), and change the Stroke (19e). The changes were needed to accommodate the smaller dimensions of the strap (19f).
Step 20
Let's add small, point-like stitches to the flap. The procedure was explained twice already. Make a smaller copy, select it and turn it into a path. Modify the "stitch" brush's properties (20a) and stroke the path on a new layer called "strap stitches." This time we don't need to rotate the dashes as they are round. Apply the same layer styles as the other stitches (20b).
Select and link the "lower plate," "lock," "upper plate," "strap," and strap stitches." Now move them to the center of the left pocket. Copy them over to the right pocket (20c). When you copy them, the layers will all be above the originals. You need to move the "lower plate copy" and "lock copy" below the "flap thickness" so they'll receive the drop shadow properly.
Step 21
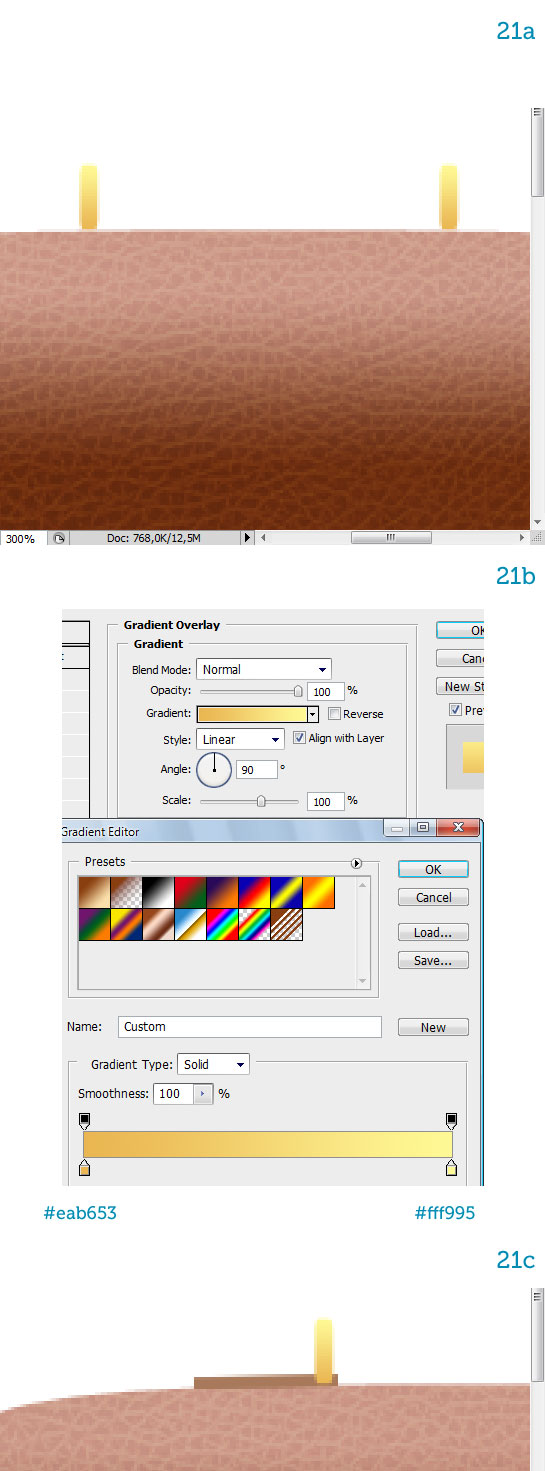
The last element to draw is the handle. Create two small metal buckles using the Rectangle Tool (U) (21a). Apply a light gold Gradient Overlay style (21b). Create a light brown rectangle behind the buckles, skewing it to conform to the flap's upper edge (21c). Copy it and flip it horizontally under the right buckle.
Step 22
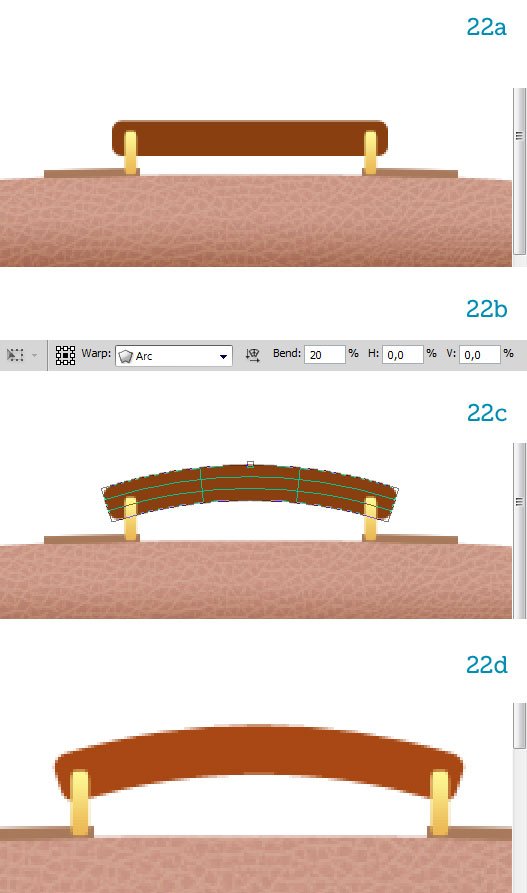
The handle is created with a rounded rectangle (Radius = 5 px) placed below the buckles (22a). Type Command + T to invoke the Free Transformation Tool, then right-click on the handle and choose Warp. In the Options bar select Arc and set Bend to 20 (22b). The resulting shape (22c) needs to be scaled down and be made lighter (22d).
Step 23
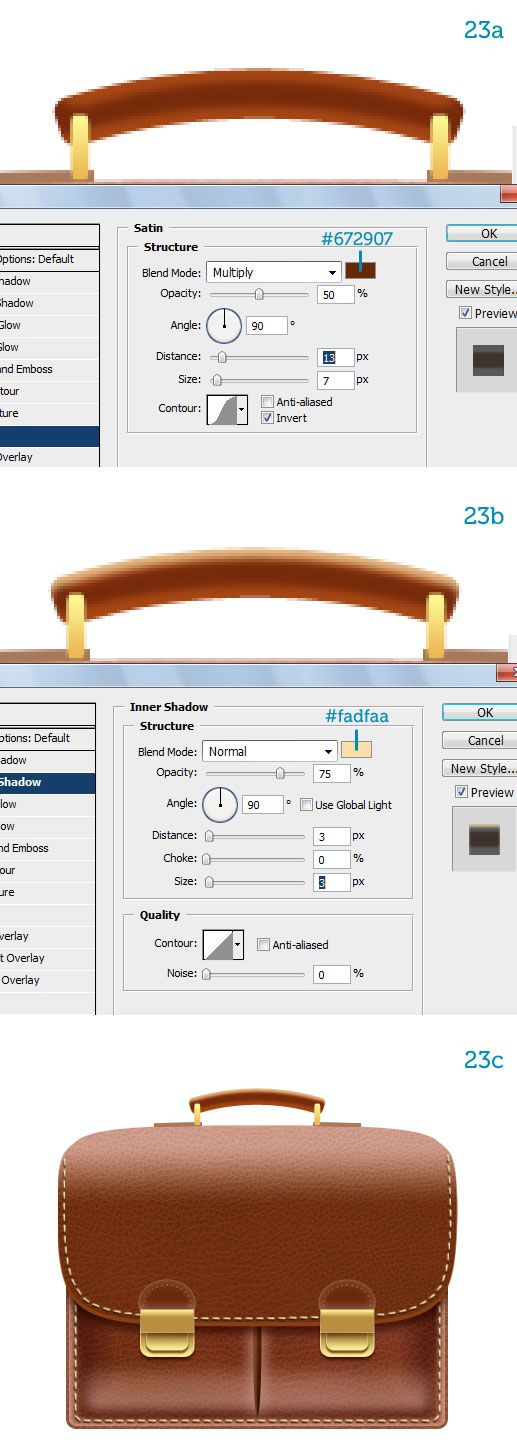
Let's add a couple of finishing touches to make the handle look better. Add a Satin layer style to darken the middle part (23a). Subsequently add an Inner Glow style to create the top highlight (23b). The briefcase is now finished (23c).
Conclusion
Complete the icon with a shadow or a reflection to suit your needs. In this tutorial you learned how layer styles can be used to simulate thickness and lighting with a minimum effort and how custom brushes can be employed to create patterned strokes. I hope you had fun creating the briefcase. Hey, you can use it to show off your impressive portfolio now!
تعليق