
 تويت
تويت
السلام عليكم
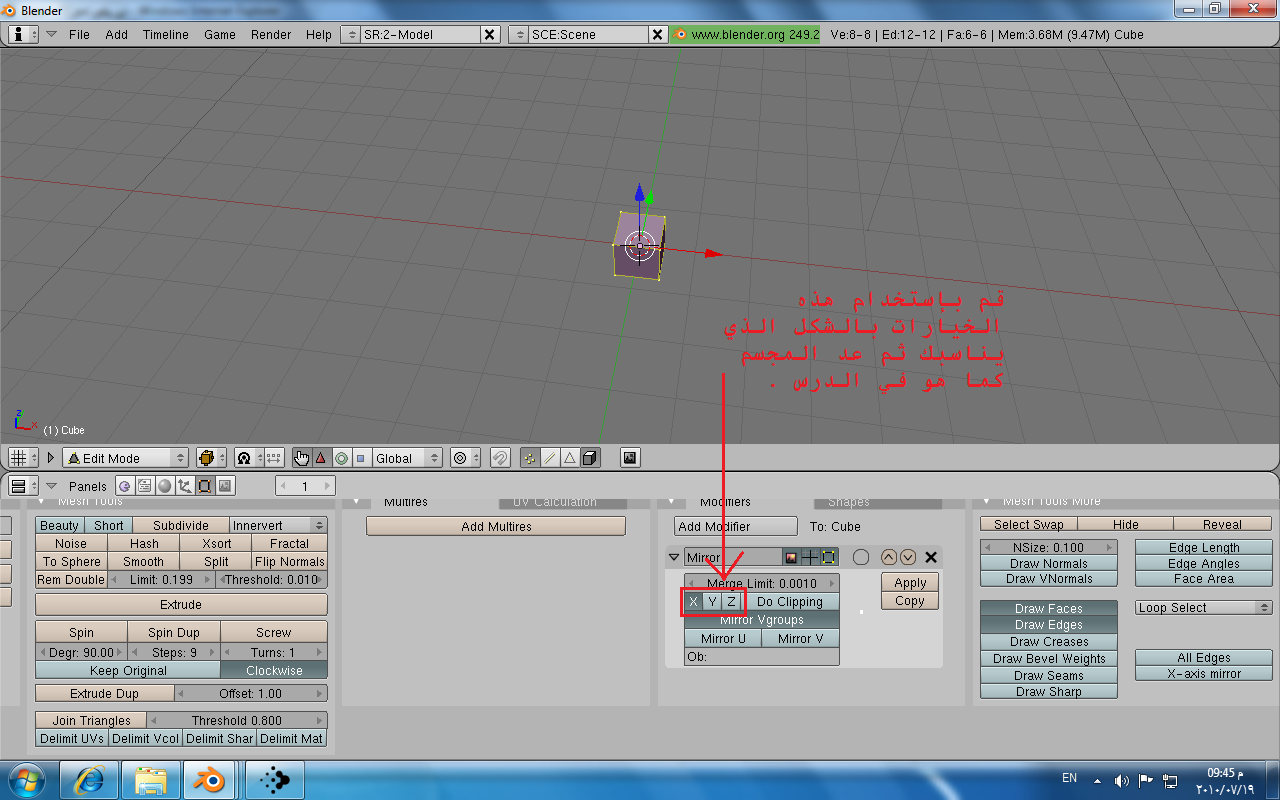
في هذا العمل قمت بتصميم نصف وجه لكن لم عندما اقوم بـ

لا تأتني هكذا
بل جهة الاصلية والجهة الاخرى تأتي على شكل خطوط فقط
****هكذا*****

هذا هو الدرس
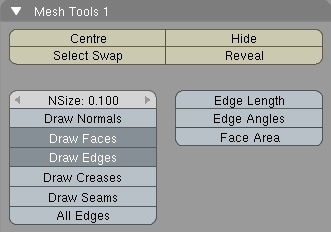
Before we start, turn on 'draw faces' and 'draw edges', in the 'mesh tools 1' panel. This is so the selections will be more visible in wireframe mode.I also use a lens value of 60, and prefer turning of the grid, but that's a personal preference, and nothing you need to worry about.
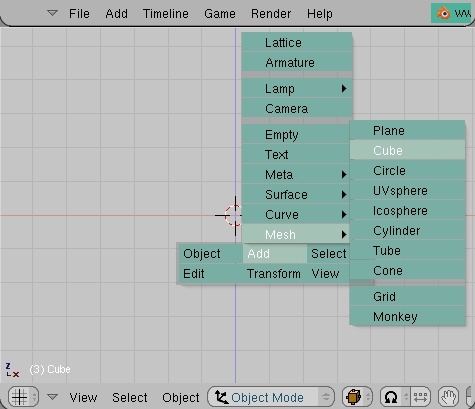 Anyhow, we shall start by pressing 'space' and voila, through a work of magic a toolbox appears. Locate the “add”-menu and hover over it with your cursor – this will bring forth a submenu containing things to “add” to your scene (duh
 . We shall be adding a cube. You’ll find that in the “mesh”-subcategory.
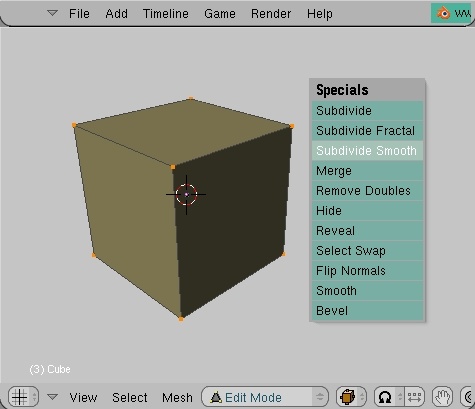 So now we have our starter-object. We will be carving out our head from this cube-primitive – impossible, you say? A pain in the neck, certainly. Impossible, absolutely not. Incidentally, this method of modeling is commonly referred to as “box-modeling”. Go figure.
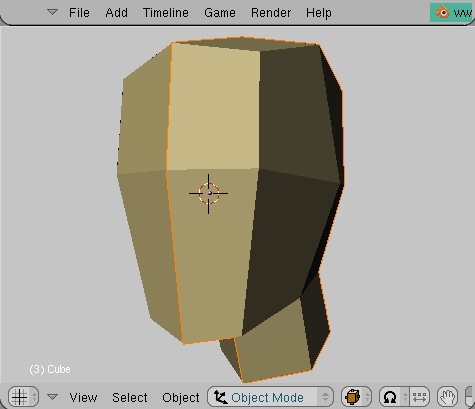
 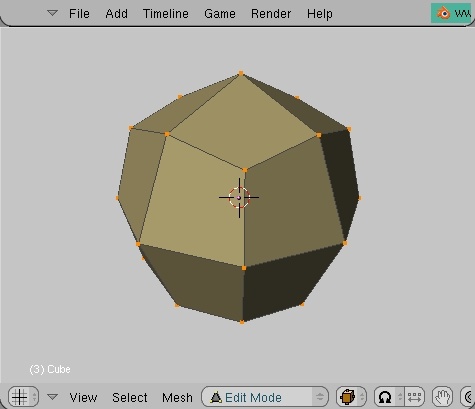 The knife tool will soon come in handy, but first we’ll save us some time of cutting and moving around vertices by selecting all verts of the mesh and pressing 'W'+'3'. You will be asked to decide the percentage of smoothing. The default is set at 100, and that’ll do fine. Now, it’s not particularily smooth, really, but now we have the basis for the shape of the head.
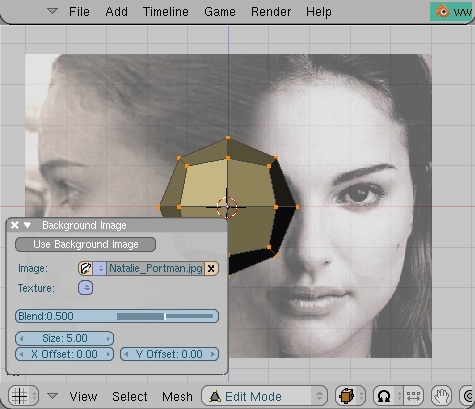 Unless you have a lot of experience working with anatomy, it’s always helpful to make use of a reference picture. It should contain two views of the subject – one frontview, and one sideview. It just so happens that I have prepared one for the occasion. Feel free to use it - Natalie Portman
What we do now, then, is, first of all to make sure we’re in orthographic mode <numpad 5>, and then set our viewport to either front- or side-view. It won’t matter which, since I have both reference-pictures combined into one, for convenient use, and I suggest you do the same. Now press the “view”-menu, and select “Background Image” from the rolldown. A floating panel appears somewhere in the 3d-window, press “Load” and locate your file. Select image. You should now see a picture on the grid. Leave the settings as they are and press the little “x” in the top-left of the “Background”-panel to close it down. I had to zoom out some to fit the entire head in the viewport. Now is as good a time as any to cut our head in half to facilitate our workflow. Go to front view, select all vertices on the lefthand side of your model(leave the ones in the middle), and then remove them with 'X'. Now you have half a face, which means half the effort of moving around verts. This is a good thing.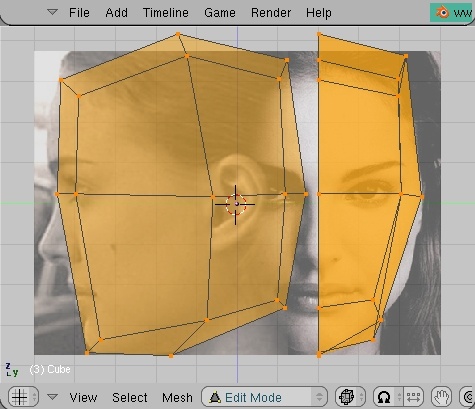 Start aligning your smoothed half of a box with the picture in each respective view, one front and one side, remember? You will need to do a bit of scaling and vert-pushing. The bad thing about this reference-picture is that the top of the head is cut off. To estimate the height, scale until the bottom vert is positioned at the bottom of her chin, and the horizontal row of verts in the middle is aligned with her eyes. Don't spend too much time vert-pushing, but rather just rough it out for now. Yes, I know it's not a very good mock-up, but It's the thought that counts
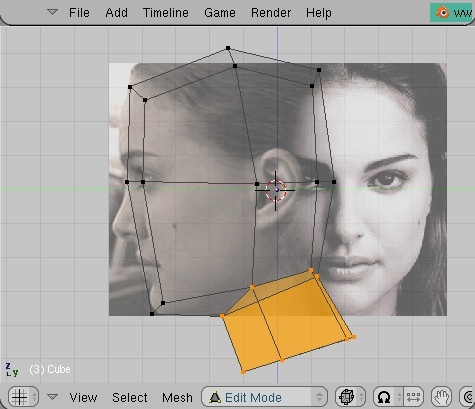 Now, go into sideview, and select the downmost face to the right. extrude 'E', right click to cancel normal transform, press 'G' and drag downwards to form the neck. Then select the vertices at the bottom of the neck, scale 'S' along the z axis 'Z' and press zero '0'. They are now perfectly aligned. Then rotate 'R' slightly to get a natural slant to the base of the neck.
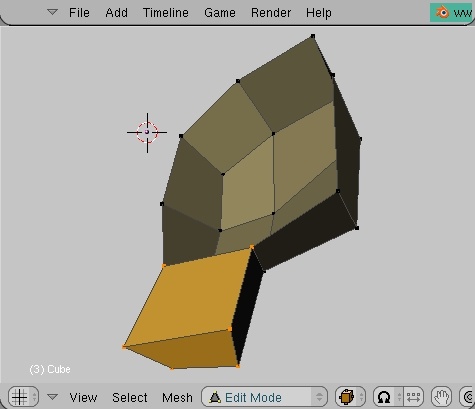 The extrude made two new faces we're not interested in keeping. They'll be redundant later on. Rotate the view until you can select the faces, and remove them.When we go on to model the details of the face, it's rather helpful to have a full head. Now, before you hit me for having you remove half of it earlier, I would have you know that it's all according to plan You need to go out of edit mode and into objectmode. With the half of head selected press Alt+'D'. Move the duplicate to the side - make sure you constrain movement to the x-axis by hitting 'X'. Press Ctrl-'M', to bring up the "mirror"-menu. Choose to mirror along the local x-axis. Then move the halves together to make a whole. The purpose of this will become apparent in the next section
 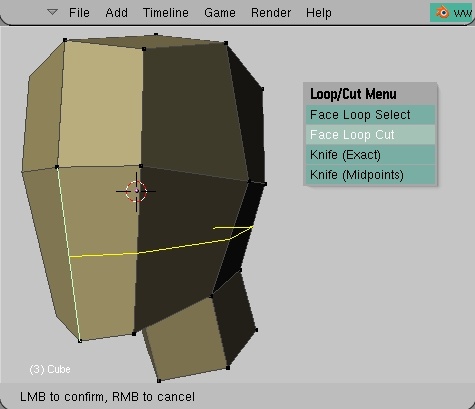 Let's bring out the chisel. Press 'K' to bring up the "Loop/Cut" menu. Choose "Face Loop Cut" and then make a new intersection below the centerline. Here's the magic - as you apply the loop cut, it's effect is transferred to the duplicate as well. So everything you do to the original, will also affect the duplicate. Try to move around some verts and see for yourself. Loopcuts can sometimes act in unpredictable ways, if you don't know how to predict them, that is To avoid trouble, it would be wise to try to the greatest possible extent to avoid tripolys. A tri would simply result in the abrupt ending of your loopcut, since it requires an adjacent edge to continue.
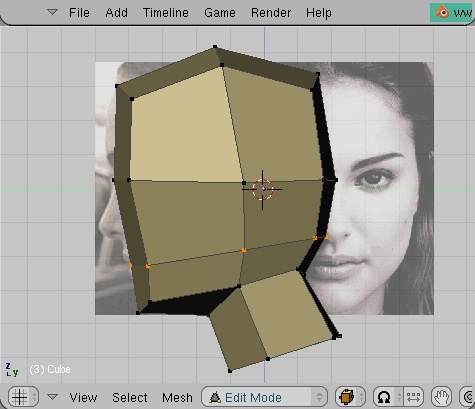 Move our new row of verts down to the opening of the mouth.
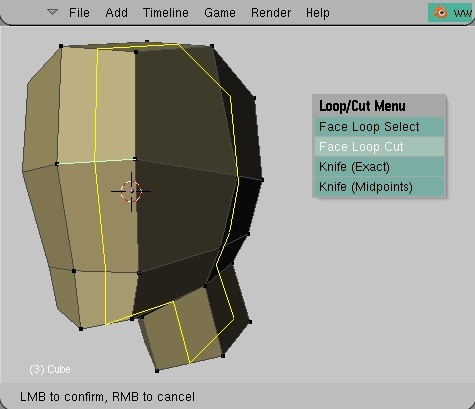 Apply another "Face Loop Cut" like in the picture.
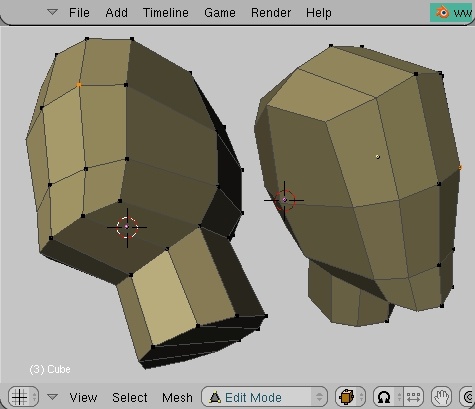 Work on smoothing out the head as you go along. the earlier on you get the correct shape, the less you have to do later. A trick, if you feel like checking if the jawline is accurate is to select the verts we extruded to form the neck and hide 'H' them. You can unhide them later with Alt+'H'. Now shape the chin to match the picture.
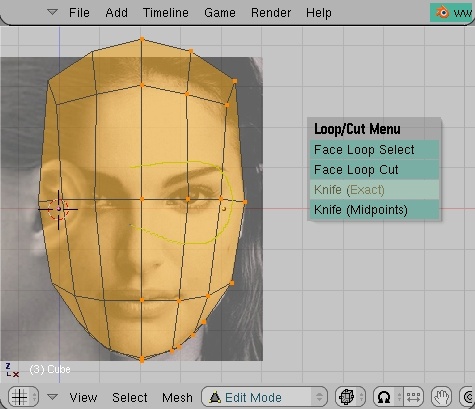 While we're at it, hide the backfacing vertices as well, and then select all. Cut 'K' around the eyesocket. Make sure you start and end to the left of the centerline. Then switch to sideview, and smooth out the sharp corners.
 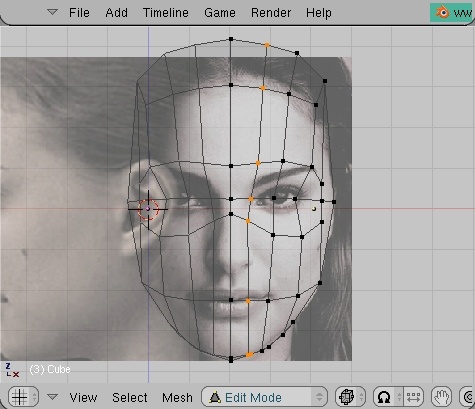 Unhide all vertices, and apply yet another loopcut and outline the shape of the nosebridge. If we don't unhide, the loopcut will result in some ugly geometry, since it only takes into account visible faces.
 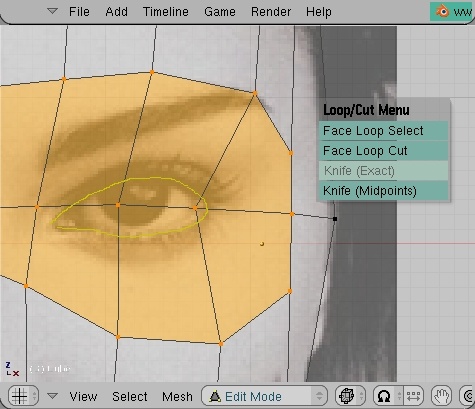 Now it's finally time to carve out those eyes. You should be familiar with the cut tool by now. Just draw the general shape of the eyes and hit enter. unselect everything but the outline you just created and delete the faces - we won't be needing them, they're just cluttering up the mesh anyway. Then, as always, switch to sideview and make sure the verts are in the right place. You willl need to move them around to match the image.
 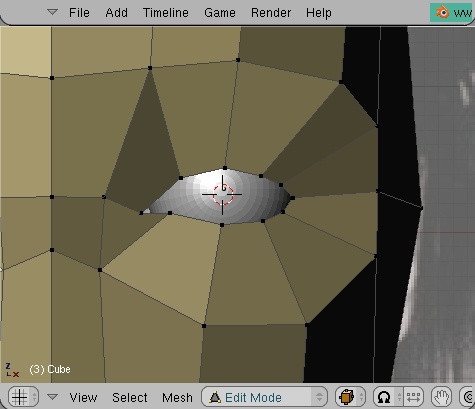 To make sure that you're eyearea has the correct shape, make a UV-sphere and shape your vertices around it. As always, move your head around in 3D to make sure everthing is perfectly aligned.
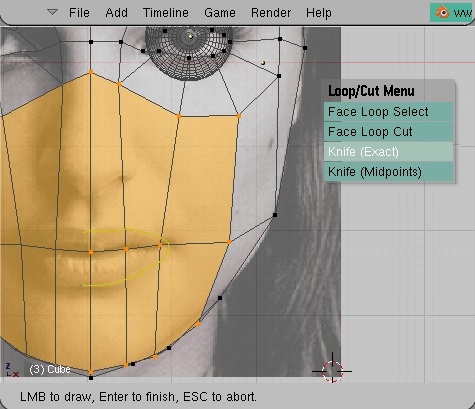 Another loopcut is needed to build on the forehead and prepare for the mouth. Make sure the vertexloop passes through the mouth. Move the verts around to have your model resemble the picture in both front- and side-view..
 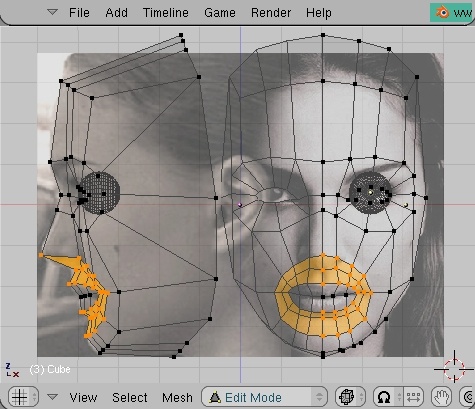 This is the last section of part one. The picture should be pretty self-explanatory. I've simply added two loopcuts around the mouth area, and pulled the vertices out in the sideview to form the basic profile of the head.
 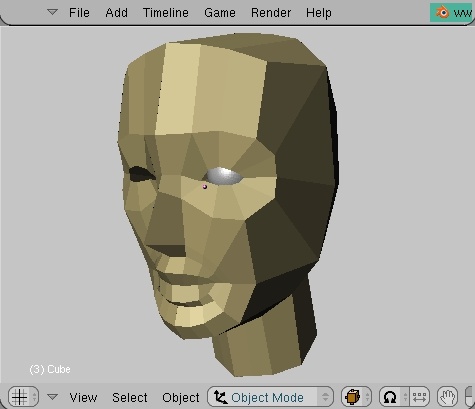 This concludes our roughing out the head. There's already a slight resemblance, don't you think? You can download the .blend here. In the next part, we'll work on putting in some more facial detail.
في هذا العمل قمت بتصميم نصف وجه لكن لم عندما اقوم بـ
لا تأتني هكذا
بل جهة الاصلية والجهة الاخرى تأتي على شكل خطوط فقط
****هكذا*****
هذا هو الدرس
Before we start, turn on 'draw faces' and 'draw edges', in the 'mesh tools 1' panel. This is so the selections will be more visible in wireframe mode.I also use a lens value of 60, and prefer turning of the grid, but that's a personal preference, and nothing you need to worry about.
Anyhow, we shall start by pressing 'space' and voila, through a work of magic a toolbox appears. Locate the “add”-menu and hover over it with your cursor – this will bring forth a submenu containing things to “add” to your scene (duh. We shall be adding a cube. You’ll find that in the “mesh”-subcategory.So now we have our starter-object. We will be carving out our head from this cube-primitive – impossible, you say? A pain in the neck, certainly. Impossible, absolutely not. Incidentally, this method of modeling is commonly referred to as “box-modeling”. Go figure. The knife tool will soon come in handy, but first we’ll save us some time of cutting and moving around vertices by selecting all verts of the mesh and pressing 'W'+'3'. You will be asked to decide the percentage of smoothing. The default is set at 100, and that’ll do fine. Now, it’s not particularily smooth, really, but now we have the basis for the shape of the head.Unless you have a lot of experience working with anatomy, it’s always helpful to make use of a reference picture. It should contain two views of the subject – one frontview, and one sideview. It just so happens that I have prepared one for the occasion. Feel free to use it - Natalie Portman What we do now, then, is, first of all to make sure we’re in orthographic mode <numpad 5>, and then set our viewport to either front- or side-view. It won’t matter which, since I have both reference-pictures combined into one, for convenient use, and I suggest you do the same. Now press the “view”-menu, and select “Background Image” from the rolldown. A floating panel appears somewhere in the 3d-window, press “Load” and locate your file. Select image. You should now see a picture on the grid. Leave the settings as they are and press the little “x” in the top-left of the “Background”-panel to close it down. I had to zoom out some to fit the entire head in the viewport. Now is as good a time as any to cut our head in half to facilitate our workflow. Go to front view, select all vertices on the lefthand side of your model(leave the ones in the middle), and then remove them with 'X'. Now you have half a face, which means half the effort of moving around verts. This is a good thing.
Start aligning your smoothed half of a box with the picture in each respective view, one front and one side, remember? You will need to do a bit of scaling and vert-pushing. The bad thing about this reference-picture is that the top of the head is cut off. To estimate the height, scale until the bottom vert is positioned at the bottom of her chin, and the horizontal row of verts in the middle is aligned with her eyes. Don't spend too much time vert-pushing, but rather just rough it out for now. Yes, I know it's not a very good mock-up, but It's the thought that countsNow, go into sideview, and select the downmost face to the right. extrude 'E', right click to cancel normal transform, press 'G' and drag downwards to form the neck. Then select the vertices at the bottom of the neck, scale 'S' along the z axis 'Z' and press zero '0'. They are now perfectly aligned. Then rotate 'R' slightly to get a natural slant to the base of the neck.The extrude made two new faces we're not interested in keeping. They'll be redundant later on. Rotate the view until you can select the faces, and remove them.When we go on to model the details of the face, it's rather helpful to have a full head. Now, before you hit me for having you remove half of it earlier, I would have you know that it's all according to plan You need to go out of edit mode and into objectmode. With the half of head selected press Alt+'D'. Move the duplicate to the side - make sure you constrain movement to the x-axis by hitting 'X'. Press Ctrl-'M', to bring up the "mirror"-menu. Choose to mirror along the local x-axis. Then move the halves together to make a whole. The purpose of this will become apparent in the next section Let's bring out the chisel. Press 'K' to bring up the "Loop/Cut" menu. Choose "Face Loop Cut" and then make a new intersection below the centerline. Here's the magic - as you apply the loop cut, it's effect is transferred to the duplicate as well. So everything you do to the original, will also affect the duplicate. Try to move around some verts and see for yourself. Loopcuts can sometimes act in unpredictable ways, if you don't know how to predict them, that is To avoid trouble, it would be wise to try to the greatest possible extent to avoid tripolys. A tri would simply result in the abrupt ending of your loopcut, since it requires an adjacent edge to continue.Move our new row of verts down to the opening of the mouth.Apply another "Face Loop Cut" like in the picture.Work on smoothing out the head as you go along. the earlier on you get the correct shape, the less you have to do later. A trick, if you feel like checking if the jawline is accurate is to select the verts we extruded to form the neck and hide 'H' them. You can unhide them later with Alt+'H'. Now shape the chin to match the picture.While we're at it, hide the backfacing vertices as well, and then select all. Cut 'K' around the eyesocket. Make sure you start and end to the left of the centerline. Then switch to sideview, and smooth out the sharp corners. Unhide all vertices, and apply yet another loopcut and outline the shape of the nosebridge. If we don't unhide, the loopcut will result in some ugly geometry, since it only takes into account visible faces. Now it's finally time to carve out those eyes. You should be familiar with the cut tool by now. Just draw the general shape of the eyes and hit enter. unselect everything but the outline you just created and delete the faces - we won't be needing them, they're just cluttering up the mesh anyway. Then, as always, switch to sideview and make sure the verts are in the right place. You willl need to move them around to match the image. To make sure that you're eyearea has the correct shape, make a UV-sphere and shape your vertices around it. As always, move your head around in 3D to make sure everthing is perfectly aligned.Another loopcut is needed to build on the forehead and prepare for the mouth. Make sure the vertexloop passes through the mouth. Move the verts around to have your model resemble the picture in both front- and side-view.. This is the last section of part one. The picture should be pretty self-explanatory. I've simply added two loopcuts around the mouth area, and pulled the vertices out in the sideview to form the basic profile of the head. This concludes our roughing out the head. There's already a slight resemblance, don't you think? You can download the .blend here. In the next part, we'll work on putting in some more facial detail.


تعليق