 تويت
تويت


-
-
لا أعرف اطلاقا
ولكن اظني تجميع الصورة فقط w w w . MAXFORUMS . n e t
-
لا أعرف اطلاقا
ولكن اظني تجميع الصورة فقط
w w w . MAXFORUMS . n e t
تعليق
-
تجميع الصور خطوة أولى لكن كيفية دمج الصورة الرئيسية الكبرى مع الصور المجمعة بحيث تظهر بالشكل ده ؟؟
وأشكرك على المشاركةتعليق
-
-
حاولت بالبلندنج موود كتير لكن للاسف ما نجحتش .. ياريت لو نجحت معاك بالبلندنج قولي على الخطوات .. وشكرا لمشاركتكتعليق
-
انتظر بشرحلكوَاللّهُ غَالِبٌ عَلَى أَمْرِهِ وَلَكِنَّ أَكْثَرَ النَّاسِ لاَ يَعْلَمُونَ
calligraphyer@yahoo.com
تابع كل ماهو جديد
تعليق
-
أكون شاكر لك جداً استاذ نمر ،، وفي انتظار شرحك ........تعليق
-
اولا هذه الفكرة تعتمد على طبقتين
طبقة تم تجميع فيها عدة صور لاشخاص ويمكن تكرار الصور المجمعه بحيث لاتتعب نفسك بكثرة التكرار مثال انظر الى الاشخاص فى الصورة ستجدهم تكرروا فى اكثر من مكان
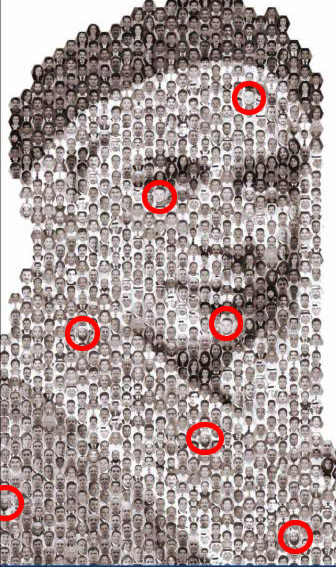
ثم طبقة للشخص الذى تريده ان يوضع مثلما فى الصورة
طريقة التحضير
افتح ملف بحجم الصورة المطلوبة
جمع ماتريد من صور او كلمات
اذهب لادجستمنت ثم بوسترايز ثم اجعل الصورة مثل الفكتور
اجعل الصورة ابيض واسود ثم غمق الالوان من خلال shift + ctrl + u ومن ليفلز ضبط الدرجات
من قائمة سيلكت حدد الوان الصورة الغامقة دون الفاتحة
طبعا الصورة فوق طبقة الصور الصغيرة قم بتحديد الطبقة اللى فيها الصورة الكبيرة من الضغط على الطبقة فى لوحة الطبقات ثم اضغط على الطبقة التى اسفلها واعكس التحديد والغى الزيادة الخارجية للصورة الاولى
خفف الصورة الكبيرة لتصبح رؤيتها بسيطة فيظهر لك الصور الصغيرة على شكل الكبيرة
ممكن من البيلدنج مود تلعب فى الخيارات لترى نتيجة افضل
واليك هذا الدرس
Using the Pen tool, crop away the black areas on both sides below the ears. Double-click on the Background layer on the Layers tab to unlock it and rename as Portrait. Create a new layer below the Portrait layer and fill it with #FFFFFF. Then go to Image > Adjustments > Posterize. Set the Levels to 4.
Hide the Portrait layer for awhile by clicking the Eye icon on the left beside the layer. Using the Type tool with your favorite font and color #000000, type in a few words as shown below.
Now we are going to create a Photoshop brush. To do so, simply make a selection around the first word like what I did below. Go to Edit > Define Brush Preset. There you have it! A new brush will appear under your Brush Preset window. Do the same for the remaining words too.
Next, we are going to customize a Fill Pattern. To do so, merge all your words together as one single layer. Go to Edit > Free Transform. Reduce the size of the words to very small like what I done below. Now hide all other layers except these words. Make a selection around them and go to Edit > Define Pattern. You can find your newly created pattern now in your Pattern Preset window.
We have not much use for the words layer anymore so you can hide it away. Unhide the Portrait and Background layers again. This time make a small selection around the black area like what I did on her neck.
With that selection, go to Select > Similar. This will select all the areas with that particular color.
Before I go on further, try to select the Brush tool and right-click on any part within the document. This is the shortcut for changing Brush sizes and its type. Hide the Portrait layer, leaving the selection loaded. Create a new layer and start to stamp around with the Brushes you created earlier. What you need to take note is to adjust the sizes before you stamp so it fits nicely within the selection. Do a few times with the right-clicking, size adjusting and stamping. Very soon you will get the hang of it.
Realize that there are some parts really small and will be troublesome to stamp into those areas. So what we can do is to fill those areas up with the Fill Pattern you made earlier too. Create a new layer below the stamps. Use the Paint Bucket tool and fill it with your preset pattern.
However, the Fill Pattern made our stamps less visible. So CTRL+left click on your stamps layer to load selections around the words, go to Select > Modify > Expand. Set the Radius to 1 pixel. Then follow by Select > Inverse. Select the Fill Pattern layer and create a Layer Mask with that selection. This will create a 1 pixel border around the stamped words.
Repeat these steps for the other two tones of grey color in the Portrait layer.
And we are done! This is roughly how you should get as your finished work.
Although the black-and-white style already looks great for me, you can also add a texture background and replace the colors to your personal preferences. Hope you enjoy this tutorial. Have fun!

وَاللّهُ غَالِبٌ عَلَى أَمْرِهِ وَلَكِنَّ أَكْثَرَ النَّاسِ لاَ يَعْلَمُونَ
calligraphyer@yahoo.com
تابع كل ماهو جديد
تعليق
-
مرحا يا نمووووووووور ... ^_^
مشكوووورتعليق
-
أنا شاكر لك جداً جداً جدأ استاذي .... وإن شاء الله في ميزان أعمالكتعليق
-
والله اكتر من ممتاز مشاء اللهقُلْ إِن كَانَ لِلرَّحْمَنِ وَلَدٌ فَأَنَا أَوَّلُ الْعَابِدِينَ
سُبْحَانَ رَبِّ السَّمَاوَاتِ وَالْأَرْضِ رَبِّ الْعَرْشِ عَمَّا يَصِفُونَرفع العبد يديه للسماء وهو عاصى{ فيقول يـارب} فتحجب الملآئكة صوته>{ فيكررها يـارب} فتحجب الملآئكة صوته {فيكررها يـارب} فتحجب الملآئكة صوته{ فيكررها فى الرابعة} فيقول اللـه عز وجل الى متى تحجبون صوت عبدى عنى{ لبيك عبدى لبيك عبدي}تعليق
تعليق