
 تويت
تويت
أكيد كلكم سمع ببرامج التقاط الصور الثابتة و المتحركة Capture Screen, Video Capture و لكن هل سمع أحدكم ب Graphics Capture
اليوم أصبح بإمكانكم سحب أي شخصية, مرحلة, موديلات .... من اللعبة التي تحبونها و التعديل عليها على 3DSMAX أو Maya بفضل برنامج 3D Ripper DX
لتحميل البرنامج:

اليوم أصبح بإمكانكم سحب أي شخصية, مرحلة, موديلات .... من اللعبة التي تحبونها و التعديل عليها على 3DSMAX أو Maya بفضل برنامج 3D Ripper DX
لتحميل البرنامج:
شرح البرنامج سهل و باللغة الإنجليزية و أي استفسار أرجوا وضعه في الرد:
Quick start guide
- Start 3D Reaper DX.

- Select analyzed application executable file and specify command line parameters.
- Select directories for storing captures frames, shaders and textures.
- Press “Launch” button.
If 3D Ripper DX is initialized properly, than “Ready to capture” label will be displayed at the top left corner of the screen. If not, than this is not a DirectX9 application – 3D Ripper DX will not work.

- Capture one or several frames with “F12” key (can be changed in options).
Depending on how efficient game draws frame, it can take from 20 seconds to 20 minutes.

- Exit application.
- Start 3D Studio Max.
- Select “File->Import”, 3DR format.

- Select file with captured frame (should be named “frameXXXX.3dr”).

You must specify back projection parameters (FOV, Aspect Ratio).
FOV value can be specified for height of screen, or for width of screen.
Aspect ratio is physical aspect ratio of monitor.
Starting from version 1.5, 3D Reaper DX is able to estimate required parameters.
Just click on item in "Recommended parameters" combo box.
Leave all other options default. Plugin will load frame geometry into 3DS Max.
1000 objects (typical draw call count) take a lot of memory, don't even try it with less than 1GB RAM !
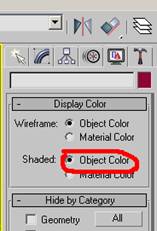
- Enter “Display” tab and select “Display objects by color” option to visually see what exactly has been drawn by each individual draw call.

- Select single object, select “Edit->Object properties..”, switch to “User defined” tab.

- See renderstate, textures, vertex streams, index stream, vertex declaration, vertex and pixel shaders used with this draw call.

- examine object's material and see what textures have been bent to each stage:

- examine all 8 captured 2D texture coordinate sets:

- Or render scene !

Maya import
Maya import is limited by Wavefront .OBJ file format. Only geometry, texture coordinates and maps can be imported.
Make sure you set "Also capture to Wavefront .OBJ" option in 3D Ripper DX launcher.

In Maya, select Import-> .Obj file format. OBJ and MTL files are stored in 3DR output directory.

Objects in Maya will appear distorted. Open OBJ file in notepad, and look at the first few lines:
#AR=1.38330, FOV=45.00000(height), Xscale:0.57298, Yscale:0.41421, Zscale:1.0
Here are non-uniform scale parameters to be applied to the scene.
- Start 3D Reaper DX.
- Select analyzed application executable file and specify command line parameters.
- Select directories for storing captures frames, shaders and textures.
- Press “Launch” button.
If 3D Ripper DX is initialized properly, than “Ready to capture” label will be displayed at the top left corner of the screen. If not, than this is not a DirectX9 application – 3D Ripper DX will not work.
- Capture one or several frames with “F12” key (can be changed in options).
Depending on how efficient game draws frame, it can take from 20 seconds to 20 minutes.
- Exit application.
- Start 3D Studio Max.
- Select “File->Import”, 3DR format.
- Select file with captured frame (should be named “frameXXXX.3dr”).
You must specify back projection parameters (FOV, Aspect Ratio).
FOV value can be specified for height of screen, or for width of screen.
Aspect ratio is physical aspect ratio of monitor.
Starting from version 1.5, 3D Reaper DX is able to estimate required parameters.
Just click on item in "Recommended parameters" combo box.
Leave all other options default. Plugin will load frame geometry into 3DS Max.
1000 objects (typical draw call count) take a lot of memory, don't even try it with less than 1GB RAM !
- Enter “Display” tab and select “Display objects by color” option to visually see what exactly has been drawn by each individual draw call.
- Select single object, select “Edit->Object properties..”, switch to “User defined” tab.
- See renderstate, textures, vertex streams, index stream, vertex declaration, vertex and pixel shaders used with this draw call.
- examine object's material and see what textures have been bent to each stage:
- examine all 8 captured 2D texture coordinate sets:
- Or render scene !
Maya import
Maya import is limited by Wavefront .OBJ file format. Only geometry, texture coordinates and maps can be imported.
Make sure you set "Also capture to Wavefront .OBJ" option in 3D Ripper DX launcher.
In Maya, select Import-> .Obj file format. OBJ and MTL files are stored in 3DR output directory.
Objects in Maya will appear distorted. Open OBJ file in notepad, and look at the first few lines:
#AR=1.38330, FOV=45.00000(height), Xscale:0.57298, Yscale:0.41421, Zscale:1.0
Here are non-uniform scale parameters to be applied to the scene.
تعليق