(1)- هل عندما انتهي من الكمبوزيشن اعمل Make Movie او اعمل Export للعمل؟
فانا عملت Export للرابط في الاعلى و لست ادري هل هي افضل ام Make Movie
(2)- عندي مشكلة في تخريج المشهد لو لاحظت جيدا المقطع في الاعلى و هي عدم ثبات
الصورة اثناء العرض لماذا؟ (اعمل Repeat للمشهد حتى تلاحظ جيدا)
(3)- هل يتم التحكم في دمج الطبقات من هنا؟ (شوف اسفل باليسار)
(4)- بالنسبة لل Scene الذي وضعته لنا طلبت منا ان نجرب عليه لم اجد الوقت الكافي للريندر
من جديد فانا استعملت فاينال جازر للريندر
(5)- هل ممكن استعمل ال Mode Add لل Diffuse بدلا من Darken او Multiply لانني
وجدته افضل قليلا؟؟
(6)- ماهي فائدة ال White Solid 1 بالضبط و اين نحتاجها؟
(7)- لدي مشكلة عندما اضيف ال Shadow pass يظهر المشهد قاتم فلم اضفه هنا هل فيه خطأ
و هذه صورة للفريم رقم 10
(8)-
لاحظت انك كنت تجيب على اسئلتنا بسرعة عندما كنت تكتب بالانجليزية و اصبحت تتاخر
علينا قليلا و انت تكتب بالعربية و اظن ان الكتابة بالعربية تستغرق فيها الكثير من الوقت
و لكن لا مشكلة اذا رجعت للكتابة لنا بالانجليزية لنستفيد من شرحك اكثر و نحاول قدر
الامكان تبسيط الشرح للآخرين فقد رايت الكثير من الردود في موضوع خالد المحرقي
باطراف الحديث لا يعارضون طريقة كتابته بالانجليزية
المهم شوف الطريقة التي ترتاح لها في الكتابة و اعطينا الكثير من زبدة التقنيات و الله يجازيك
كل خير اخي حازم و ان شاء الله يستفيد الجميع بدون استثناء من هذا الموضوع
اين انتم اخواني aloshM و Fares K و ahmedyounis و البقية
الفيديو بتاعك مش عارف اشوفه...
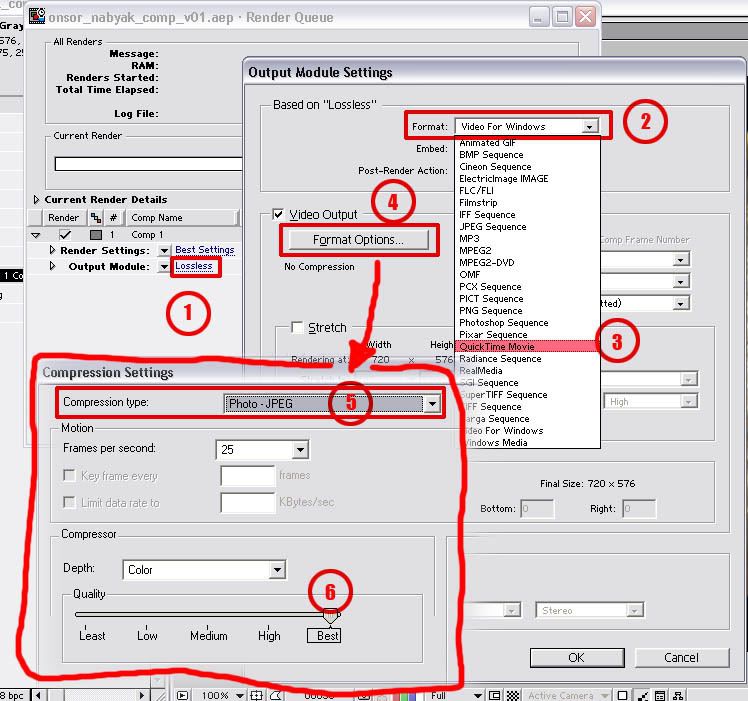
(1) عشان ت render من ال after FX
composition > Make movie
او دوس Ctrl+M
ها يفتحلك ال render queue تدوس علي lossless ها يفتحلك ال output module settings
تختار quicktime وبعدين تدوس format options واختار ال compression ... photo jpg
best
(2) يا ريت تبعت ال movie ده في حته تانيه عشان اعرف اشوفه.
(3) لا ياصديقي .... ده حاجه إسمها solo معناها وريني ال layer ده بس
اللي هو في المايا hide non selected
(4) ... مش فاهم صراحةً تقصد أيه..!!
(5) ال blending modes ده مش قواعد .. جرب كل وحده لحد ما تلاقي المناسبه
ليك...
(6) انا شرحتها ...
(7) ال shadow pass ده مش مظبوط.. لانه فيه FG وده مش مفروض يحصل
shadow pass
assign a Usebackground shader with reflectivity = 0 and speculare
=0
select all objects and remove Visible in reflection and turn off
FG and show the light and make it cast shadow
assign a Usebackground shader with reflectivity = 0 and speculare
=0
select all objects and remove Visible in reflection and turn off
FG and show the light and make it cast shadow
شكرا كتير اخي حازم ، مشي حالها معي ..
اخي Nazeem R شكرا لاهتمامك السيد حازم وصللي الفكره.
اقصد انني اخذت وقت كبير في الريندر لل scene الاول الخاصة بي بالفاينال جازر
و ليس عندي وقت كافي في الوقت الحالي للتجربة على ال scene التي بعثتها لنا
لنجرب عليها و لكن ان شاء الله ان كان عندي وقت ساتمرن عليها
(1) عشان ت render من ال after FX
composition > Make movie
او دوس Ctrl+M
ها يفتحلك ال render queue تدوس علي lossless ها يفتحلك ال output module settings
تختار quicktime وبعدين تدوس format options واختار ال compression ... photo jpg
best
هل هذه هي الطريقة الاحسن المتبعة في الاخراج لانتاج اي مشروع لصاحب الطلب؟
(7) ال shadow pass ده مش مظبوط.. لانه فيه FG وده مش مفروض يحصل
shadow pass
assign a Usebackground shader with reflectivity = 0 and speculare
=0
select all objects and remove Visible in reflection and turn off
FG and show the light and make it cast shadow
sorry, it is a quick question about optimize for animation
i'm trying to make a layer with this option and another one NO
when i turn it off it happens in the 2 layers
i can't make an override layer
can you help me
thanks
لا حول ولا قوة إلا بالله I Do Not Have Arabic Keyboard To KNOW and NOTto DO, is really NOT to KNOW Learn from Doing, not by Dreaming
sorry, it is a quick question about optimize for animation
i'm trying to make a layer with this option and another one NO
when i turn it off it happens in the 2 layers
i can't make an override layer
can you help me
thanks
صراحةً .. انا مش فاهمك اوي ...
بس عمتاً.... شوفوا يا جماعه .... الاصل بتعنا هوه ال master Layer
تمام... كل ماهتعمل layer هاياخد ال options بتاعت ال master Layer
وبعدين انت تعمل override وتغير اللي انت عاوز تغيره.. واضح
طيب ... لو انت عامل override on option و شيلته .... يبقي ها يرجع لاصله
اللي هوه ... masterLayer
هذا درس من أرشيف النت نقلته هنا ممكن يفيد بعض الشيء لإثراء هذا الموضوع الجميل أكثر و كلنا نستفيد إن شاء الله_
الدرس:
If you want very fine control in post over every element of the scene, you could render the the objects in tons of passes with a different one for every element in the render, ambient texture, different light passes, shadows, reflection, refraction, GI the list goes on.but generally thats not really necessary.
So if you like you may want to include lighting/shadows/specular/GI all in this one pass and maybe just add a couple of additional passes to this ‘Beauty’ pass.
For compositing with live action, we generally used a standard set of passes on all shots, and then on some shots we needed some other specific passes to help out with mattes, masks and the like - which I’ll try and mention a couple of later.
First of all, here is the background plate
Don’t think there’s much to explain on that one.
- Beauty (RGBA could be named ‘Diffuse’ or ‘RGB’ perhaps)
This is the base for the cg elements, and it can vary a lot what is included in this pass.
Our standard beauty pass included shadows cast onto the objects but not shadows cast onto the plate (separate pass for them) but as there isn’t any shadows in this, I won’t go into why now.
When we light the diffuse pass, I find it helps to make it a bit brighter than you want in the final, especially to take into account the ‘Ambiant Occlusion’ pass which adds the darker areas in this shot.
- Specular Pass (RGB, Alpha channel not needed)
This pass is for specular only, and is layered over the top of the beauty pass with ’screen’ (or you could ‘add’ (additive) it). Screen or Add basically remove all the black in the pass, leaving just the highlights (the specular in fact.)
This is the same for a Reflection pass, and if you want to render a light in a separate pass - as again you just want to hide all the black pixels values and keep the white values.
- Reflection Pass (RGB, Alpha channel not needed)
Whoops, I seem to have got a little ahead of myself there. Anyway this reflection pass, is on the plate, so instead of compositing it onto the last two passes, we can lay it straight onto the plate. Smashing.
- Reflection Matte Pass (RGB, Alpha channel not needed)
Now you can’t just slap the reflection onto the plate in this instance, because there are already reflections on the floor that would be occluded by the signs were actually there (they would block them).
So I found a good way to create a matte for where the reflections will be is to make a pass where the signs materials to a constant white material, and have that as the only thing reflecting in the scene.
N.B This needs to be inverted in post truthfully I made the objects black, and rendered them on a white surface and a white environment - but now I realise that is way to overcomplicated as you can just invert it.
You can multiply this pass onto the plate before the main reflections to matte out those reflections you don’t want.
Another note about the reflections I’m afraid. If you look at the plate, you can see the differences between the soaked floor, and the standing water/puddles, the puddles are sharp reflections while where the water has soaked in, the reflections are blurred.
So before those passes are rendered I painted a matte based on the plate - and used a camera projection to apply that texture onto the floor, to control the amount of blur for the reflection.
Hopefully that made sense.
- Ambient Occlusion (RGB, Alpha channel not needed)
This pass effects the CG elements as well as the plate (although often you may want to render 2 separate AO Passes), so to layer it onto both, before this we need to layer the CG passes we have so far, over the plate (including the reflections).
For this pass, we just want to keep the darker values, so to remove/hide the white, we will use ‘Multiply’.
- ID Pass (RGBA)
This should come earlier in the comp, I mainly use it to colour correct the diffuse pass before anything else is layered on top (so maybe earlier in this guide? But its a bit special so I thought I’d leave it till now). This is a very useful pass for making multiple matte’s (masks) in one pass.
By giving certain objects materials that are either, 100% Red, 100% Blue or 100% Green we can extract just one of these channels (R, G, or B) in post as a matte to do colour correction on specific objects or whatever you please. As you can see by this gif below, which cycles through the RGB, then Red, then Green, then Blue channels.
If you’re feeling fancy you can use the A channel too, currently the A channel will show the objects that are in the R,G,B channels (as they have an alpha of 1 / 100%), but if you assign everything else a black material with an alpha of 1, you could specifically assign some objects with a black material with alpha 0.
Hope that made sense, don’t have any images for that at the moment.
- Here is the final Graded shot:
الشيء الذي يلفت الانتباه في هذا المقال هو في المقدمة التي تكلم فيها صاحب المقال عن أنواع الـ passes،، يقول في ما معناه إن أردتكم مراقبة جيدة لكل object بالمشهد لازم الريندر يكون أطنان من الـ passes (مبالغة هو يعني حاجتنا إلى التعامل مع الكثير من الـ passes لمصلحة المشهد) بشكل مختلف من object لآخر (لا يلزم أن يكون بالضرورة استعمال نفس الـ passes لكل كائن بالمشهد)_
pass للـ ambient و passes للإضاءات المختلفة و أخرى للظلال و الإنعكاس و الإنكسار و الـ global illumination و القائمة تطول_
و لكن (و هذا هو المهم) هذه ليست من الضرورات (يعني حسب الحاجة و هذا يرجع للمشهد نفسه كيف هو؟)_
ملاحظة أخيرة: كتب صاحب المقال أن هذا الدرس بالمجان إن كانت قوانين المنتدى تمنع تداول صفحات النت_
 تويت
تويت


تعليق